Monday 30 January 2012

Max Factor's Fantasy Fire - Swatch - UPDATE!

Hello my lovelies.

So after my last post, I decided to do as many of you suggested - I layered Max Factor's Fantasy Fire over a black polish. Here you go:

CLICK to enlarge
 I made the pictures bigger just so you could see the shimmer.  Ignore the silver glitters - they belong to the Orly 'Goth' which you can see on it's own, here.

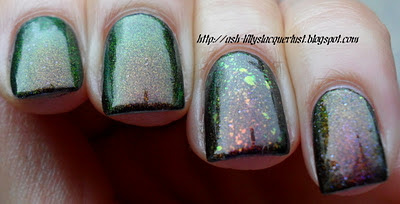
 You will notice that the ring finger has some flakies on it. They belong to Nfu-Oh's 51.

So, from what I can see, other than the size of the flakes and shimmer particles, both polishes are very similar. They both have a similar base colour and the shimmers and flakes seem to be the same in colour too. Don't get me wrong; I like the Max Factor but I'm more into bolder effects.

Hope you enjoyed the update.

xx

Saturday 28 January 2012

Max Factor's Fantasy Fire - Swatch

Today, I have a swatch for you.

I was having an email conversation with RM the other day and she mentioned a Max Factor polish that seems to be a big hit at the moment. As it happens, I have been walking past this polish for a good while, simply because of the size of the bottle and how much it actually cost. Yes, I'm frugal.

Anyway, to cut a long story short, I picked up a bottle just so I could see what the hype was. There have been times when a polish has been 'all the rage' and I've looked at it and thought 'why ?!' Remember Revlon's 'Perplexed'? Yeah...I didn't see what was so special about it.

 This is 'Fantasy Fire'.

Now, I have a few things to say about this one. The pro's are that it's gorgeous and has small shimmer particles in it and you could also put this in the category of a duo-chrome. It's an eye-catcher alright. I was wearing this last week and I got quite a few comments at work. The most amazing fact is that it is available at Superdrug and Boots in the UK...but not in the US apparently. It's usually us over here who miss out on the good stuff.

The con's? Oh my goodness. This is four, yes FOUR coats of polish. If you don't like the visible nail line (VNL), you might want to layer this over another colour with a better coverage. Because the polish is so thin and the bottle is so tiny, you may not get many wears out of this one I'm afraid. To top it off, this polish costs £3.99. Given the brand, you would expect to pay a little more, but they could have made the bottle just a little bigger.


As much as I don't want to like it (simply because I feel cheated by the size of the bottle), it IS a cutey. Imagine putting a matte polish on top...or even slapping a coat of glitter in between two layers of this beauty.

There are actually quite a few of these tiny polishes available in various colours, but I haven't had a good look at all of them. Maybe I will and maybe I'll come back with some swatches. Maybe.

Take care.

xx

Friday 27 January 2012

Removing glitter polish in just five minutes...

Okay, so I didn't actually time exactly how long it took to get that gorgeous glitter polish off my nails, but it 'felt' like five minutes.  I know that a lot of ladies (and gents) may shy away from wearing glitter nail polish simply because it can be time consuming to take off when rubbing at it with regular nail polish remover. I can tell you that you would never catch me rubbing and rubbing at my nails with plain old polish remover - I'd be there all night.

This is how I remove my glitter polish with little mess, little fuss and in very little time.

You will need:
 Cotton pads/balls or whatever you usually use (you only need enough to cover each nail), acetone/false nail remover and some small strips of foil long enough and wide enough to wrap around your finger at least once.

Soak a cotton pad in acetone/false nail remover, put it on your nail and wrap a strip of foil around the whole pad.
Give it a squeeze to make sure that the pad has close contact with your nail.

 Sexy huh? Leave the pad on for up to five minutes.

To remove the polish, go to the finger you first started with. Gently rub the foil and pad back on forth once or twice with a little pressure being applied to the nail, then remove your finger from the foil. To minimise messy cuticles and sidewalls, you could just slide your finger out of the foil whilst adding pressure to the nail and your nails will come out CLEAN. It's that simple.

This is the result of me simply sliding my nail out for the cotton and foil. Minimal mess, no glitter all over my fingers or hands.

If you've never seen this method of polish removal before, I urge you to try it. You'll use less cotton, less acetone and waste less time. You need never be in fear of glitter polish EVER again!

I hope this post has been helpful!

xx

Thursday 26 January 2012

Wonder Grass Franken

Hey all, how's it going?

Tonight I have a swatch of a beautiful polish that only two people in this entire world (I think) are privvy to. Yes, it's a franken by Anastacia! I saw this on her Facebook page a little while ago and I left a comment telling her how much I liked it. So she sent it me...with a load of other polishes. Not for a swap; she just wanted to!

This is 'Wonder Grass' - a green jelly with green and gold glitter particles.

Eh. Don't worry about the clear polish right up there in the cuticles.

Have you ever created a franken? What are your methods? Do you mix old polishes together or use pigments or glitters? 

xx

Sunday 22 January 2012

Green nubbins

Hey all, ready for Monday?

As my nails get ever shorter, I'm going to have to come up with manicures that work on nubbins.


 Not really much to say about this one.  I'll go into the colours in another post - I got all three polishes in a 'lovey package' from Anastacia

 My free edge may 'look' longer here, but I have literally about 2mm on my index finger. Had I painted my free edge only, I wouldn't have had much of a green tip!

Here's an example of the depth of my nail beds, but on my right hand before polishing.

Have a wonderful week friends.

xx

Friday 20 January 2012

My second attempt at a 'one-stroke' manicure...

Hello friends old and new.

Today I finally tried to use some of the numerous nail art brushes that are languishing in the bottom draw of my Helmer.  I did this very quickly (trying to grab the last of the natural light after the school run) but alas, my photos are somewhat lacking.  My home-made light box has now been hi-jacked by my cat and I don't have the heart to evict her. So, until I can get to a craft store to buy some sheets of plastic to make another, I'll just have to settle for sticking my hand out of the garden door in the freezing weather to take pictures.

My nails are getting shorter by the week - these women on my manicure course are devils with emery boards. If I file these bad boys right down, those sadists won't have anything to play with.  One woman was trying to slice off dry skin around my cuticles with a cuticle knife. Seriously. I don't HAVE anything to cut and I just know she was trying to slice me up, just so that she could practise with that knife. Next week we go on to pedicures. BARF.


 A mini bottle of China Glaze's 'Urban-Night' from the Metro Collection (2011), such a beautiful purple cream.

Ha! This was the jumper dress I was wearing today...perfect match.

One-stroke 'technique' with red and white acrylic paint.  Also some extremely lazy dotting...with a striping brush. For shame.

It's not perfect yet, so until I get it completely right, I won't post a tutorial. No point in showing you how to do something the wrong way, is there?

I hope you likey!

xx

Saturday 14 January 2012

31 Day Manicure Challenge - a reminder of the manicures.

Hey everyone.

Back in November 2011 (sounds like a distant memory doesn't it?) I undertook the 31 Day Manicure Challenge which saw me creating a new manicure each day for 31 days. It was hard at times, but it was so much fun. I seriously urge you to try it yourself if you haven't already. If you are currently doing it, let me know.

For those of you who may have missed my daily instalments or would like to see them again, I've compiled all the links below so that you can have easy access. I've also added a page specifically for this post so that you can visit whenever you wish, without having to trawl through the entire blog.


The daily schedule, although you do not have to change your nails every single day if you don't want to!

Honestly, this is my favourite manicure. I'm not sure why, but I love it.

Finally, the links:

Day 1 - Red
Day 2 - Orange
Day 3 - Yellow
Day 4 - Green
Day 5 - Blue
Day 6 - Violet
Day 7 - Black and White
Day 8 - Metallic
Day 9 - Rainbow
Day 10 - Gradient
Day 11 - Polka dots
Day 12 - Stripes
Day 13 - Animal print
Day 14 - Flowers
Day 15 - Delicate print
Day 16 - Tribal print
Day 17 - Glitter
Day 18 - Half-moons
Day 19 - Galaxy nails
Day 20 - Marbled nails
Day 21 -Nails inspired by a colour
Day 22 - Nails inspired by a song
Day 23 -Nails inspired by a movie
Day 24 - Nails inspired by a book
Day 25 - Nails inspired by fashion
Day 26 - Nails inspired by a pattern
Day 27 - Nails inspired by art work
Day 28 - Nails inspired by a flag
Day 29 - Nails inspired by the supernatural
Day 30 - Nails inspired by a tutorial
Day 31 - Recreate your favourite challenge

Enjoy!

Thanks for reading.

xx


Friday 13 January 2012

Mavala 'Double-Lash'. The eyelash growth experiment pt 1

Hello my lovelies.

If I were to ask you which three things women would like to grow longer what would you say? Nails, hair and lashes perhaps? Well, this post is an experiment to see whether or not a particular eyelash growth solution is worth the packaging it is sold in.

This idea was borne from a conversation I was having with a work colleague.  At my first Manicure and Pedicure class this week, we were told by the lecturer that, at the moment, the most financially lucrative beauty procedure (aside from cosmetic surgery) is the application of individual eyelash extensions! I was shocked, but then remembered reading somewhere that some people actually get hair at the back of their heads transplanted into their lash line, much the same as they would when trying to thicken bald patches on scalps.  I also read that unlike normal lashes, this transplanted hair would continue to grow as a head hair would. So that would mean trimming your eyelashes at regular intervals! My colleague and I had a good laugh about that, but it got me thinking. My lower lashes are a little sparse and I'd heard that you can use Vaseline or olive oil to condition them, but I wondered if I could actually grow them out without shelling out a load of cash...or having greasy, oily lashes.

I found a wealth products and reviews on this site which you can read if you are serious about trying to grow your eyelashes. One of the products there was one I picked up from in Boots for just over £10.

 The blurb on the website states:
"Mavala Double Lash is a nutritive treatment that enhances eyelashes by lengthening and strengthening them. Stimulating faster hair growth, the Switzerland-born product is applied at night before bed and contains a multi-protein mixture that not only causes existing lashes to grow longer but additional lashes to grow in. Unlike other lash enhancement products that are applied to the eyelash line on the upper lid, Mavala Double Lash is brushed directly on to the lashes like mascara."

But, does this thick, milky liquid REALLY work? I intend to put this on my lashes each night before bed and update this post every weekend to let you know of my progress. You've got to love an experiment, right?

Here is where I am now, greasy, sans make-up, first thing in the morning. Don't judge me!

You can see how sparse my lower lashes are. It's not detrimental to my self-esteem and I'm generally not bothered, but if I could thicken them up, it would be a bonus.

After mascara:
Still sparse.

My mascara, in case you are interested:


Okay, wish me luck!

xx

Monday 9 January 2012

Kiss Meh Nude!

Happy Monday folks.

Today's manicure is inspired by a lot of talk on Twitter about red lipstick and also a pair of leggings I saw on  last night's episode of Dancing On Ice. Inspiration comes to me from the strangest of places, I have to admit.

Black nail polish, red acrylic paint lips and dots.

Please ignore how dry my cuticles are. I could do with a paraffin wax manicure because my hands are obscenely rough.

Here is another manicure that I was wearing the other day. The Mannequin Manicure was created by Sophy Robson and I remember seeing it in a magazine some time ago. I'm really not found of nude colours on myself, but it seemed like a great concept so I thought I'd try it out.

Nails Inc's 'Balmoral', topped with Rimmel's Matte top coat.

Bleh. This colour washes me out terribly and the lighting was horrible too.

I have come to the realisation that I cannot be happy with a manicure if it not enhanced or adulterated with 'stuff'. Ah well, what are ya gonna do eh?

xx

Saturday 7 January 2012

Flakes on a Friday...on Saturday

Oh wow. I cannot believe my GFC follower count. I am seriously overwhelmed right now. 701 Google Friends...and that doesn't include those of you who subscribe to my blog in other ways. Thank you all so much for your support. I've had a really hard week (emotionally) and this is just one of the things that's really put a smile on my face.

I have some news. I've enrolled on a manicure and pedicure introduction course and I start next Wednesday. The course is six weeks long and I'll be attending college on Wednesday nights. The same week this finishes, I will start my NVQ level 2 VCTC (vocational course) in Nail Technology. Yep, I'm going to train to be a qualified nail technician! I'm really excited and, if all goes well, I intend to share my knowledge with you along the way.

Here is what I did yesterday. Pure laziness, I'm afraid. Flakies and water decals.

China Glaze's 'Fifth Avenue'.

Slicked with a generous layer of Nubar's '2010', which reminds me, I need do a Nubar and Nfu-Oh haul at some point this year. Maybe as a treat after I graduate from 'nail school'.

Hmm. So I'm posing with the Nubar, but actually have a layer of Rimmel's Matte top-coat on.

Water decals from Viva La Nails (purchased by moi), again with the matte top-coat.

I hated the matte look for a good while, until very recently so I think I need to give mattificationism (it's not a real word but I don't care)  the credit it deserves.

Happy weekend lovelies.

xx


Tuesday 3 January 2012

The irk-some Ruffian

Good evening all.

How's it going? Three days into January and so far so good? Hopefully you are doing great, but if you aren't, take heart because things can and will get better. 

Okay. I thought I'd try water marbling again because I had an 'good' experience during the 31 Day Manicure Challenge I did last year. Oh my goodness. I spent about two hours painting a flawless white base colour, dripping polish with anticipation, making rubbish patterns, cursing the water, the polish, my fingers and the cup. In the end, I was left angry...and still wearing a white base colour. I grabbed the first colour I could find and whilst painting over the white, it occurred to me that I had never created a Ruffian manicure. 

 I'm not sure why it's called 'Ruffian' but I love it. My husband doesn't. He thinks it's irk-some and it reminds him of 'pus at the top'. Erm, cheers :-\  I should be offended, but I'm not because he is one of my biggest fans.

I didn't use any tape or manicure guides. I painted one layer of pink over the white with a steady hand and then one layer of purple over the pink. A little dab of glitter and there you have it - pus nails!

So, do you like them? With the right colours you could continue layering perhaps. Oh, by the way, hubby just looked over and said 'I like the concept'. Yeah, you're too late mate, I saw your involuntary shudder when I showed you my masterpus, I mean masterpiece :-p!

Thanks for reading folks and thanks for your comments.

xx