Monday 31 October 2011

31 Day Manicure Challenge - I'm starting tomorrow!

My lovelies :)

Tomorrow I will be starting the 31 day manicure challenge as seen on several blogs over the last few months. For me, this is a big commitment, but I'm really excited about it so I'm going to do my utmost to keep up with it.  Feel free to join me (regardless of whether you blog or not).

Here are the themes:


Are you ready to do this with me?

There are lots of ladies doing this at the moment - Sammy, Anastacia  and  Rie to name a few, so if you are going to do it too and get a bit stuck, why not pop over to them for some inspiration?

Let me know if you've alright started or will be starting this challenge.

I'll be back tomorrow with the first installment!

xx

Miracle Growth experiment....2 WEEK UPDATE!!

I had to try and squeeze this in because I should have really given you an update yesterday.

Remember I decided to buy Sally Hansen's nailgrowth Miracle Serum? I was trying to get a 59% boost in my nail length in a two week period (as promised by the product) and also some nice cuticles too. After rubbing a drop of serum into my nails and cuticles twice a day for two weeks here are my results.

*Drum roll please*


Errrrrr. I see progress, as you would in any two week period, but 59%? No, I don't think so.  The middle and ring fingers look a good deal longer, but I don't think it's anything spectacular. What do you think?

I gained around 2mm on the index fingernail - blah.

I'm not sure if this does what it promises to do. The formula of the serum is not moisturising all - it's water based and after application, it didn't alleviate any dryness. As much as I think it didn't work for me, I really don't want to write it off just yet. I'm going to use the bottle for another two weeks just so that I can say I gave it a good try.

I'm so sorry I couldn't come back to you with a 'Miracle Growth Stimulator' that is like gold dust in a bottle. Alas, t'was not meant to be.

Have you had any luck with particular products?

xx

Catherine Arley HOLO swatch 805

In this post I have another Catherine Arley Holographic goody to show you.

805 and some nail stickers from Viva La Nails

The sun's been out recently so I've been making the most of the natural light. The clocks went back an hour over the weekend and it's going to start getting darker earlier :(  I'm going to have to start using my lightbox again. Either that or carry my camera and polish around with me and take nail pictures in my work car park at lunch time!
Close up of the sparkles.

xx

Sunday 30 October 2011

Peripera Pussy Cat

Don't you just LOVE that pussycat? I got her and a load of other goodies from the lovely Anastacia recently in a swap. If you don't already know her, you might want to visit her - she's a doll.

This polish thinks she's so posh, she doesn't even have a name or number. When it dries, it has an interesting smell. Sort of fruity methinks. Don't quote me though; I've had a cold for about a month and can barely taste or smell a thing. One of my friends told me that I should start charging this cold rent because it's been with me that long.

The plate used was BM024 - from the newer release of plates.

You know I'll try to help you save money where you can, right? Well, MUA are the best for a black stamping polish. No lift, no drag, quick drying...all for £1.

My work colleague said that this mani looked like an Easter egg. Is she right?

xx

My first blogging anniversary: GIVEAWAY-NOW CLOSED!!!

Oh my goodness! I cannot believe that I missed my first year anniversary (01/10/10)!

When I started my blog, I was trying to grow out some damage that I had sustained through wearing acrylic wraps.  There is nothing wrong with wearing acrylics but when they make your nails look like this...not cool.

 In retrospect, it wasn't even the acrylic. It was the e-files that they like to use in salons that did this damage.

This was before I soaked off the acrylics and went au natural. 

I started to make progress a month or so later...you can still see the damage on the tip of my ring fingernail.

After a while it became less noticeable.

I began to experiment with things I had seen other blogger's doing...

...as well as doing my first tutorials and being quite proud of them.

I experimented with polish I had never heard of. I had never, EVER, seen a holo before!

Here is my favourite most recent manicure:
After a year I'm now more knowledgeable, heavily polish laden and truely blessed to have such lovely readers.

I really do appreciate your visits, comments and emails. I may not get a chance to answer to every comment, but please know that it puts a smile on my face to know that I have cyber-chums and chumlets just as obsessed with nails as I am!

As a thank you for your support and to celebrate a year of my blog, I'm going to run an international giveaway!

There are TWO prizes.

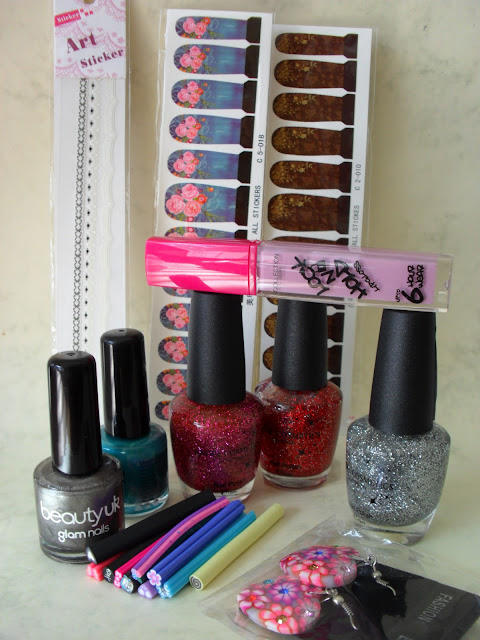
First prize - water decals, lace stickers, polish, fimo canes, stamper/craper, image plates and earrings!

Second prize: Polish, fimo canes, water decals, nail sticker, lip gloss (got from a blogging event but unused/swatched) and earrings.

TWO people will be chosen with Random.Org and allocated either the first or the second prize.

Giveaway is open INTERNATIONALLY.
Winners will be notified via email and will have 48 hours to reply to me - failure to do so will mean I have to chose another winner.
To enter:
  • You MUST BE A FOLLOWER. Please leave your Google Friend Connect screen name in the comments box - Compulsory (2 entries)
  • For extra entries you can blog about this giveaway and leave the link in the comments box so I can see (1 entry)
  • Put a picture of the first giveaway prize in your side bar - leave the link in the comments box (1 entry)
  • Leave your email address so I can contact you if you win - I won't publish it!
Don't worry if you don't see your comments after you enter. I won't publish comments with email addresses in them. Unfortunately, I will not be able to acknowledge everyone's entry personally as I could before - if you have left a comment, I WILL see it.

Closing date is 30th November 2011 at 12:00am GMT. The winners will be drawn shortly afterwards
Good luck and thank you so much for your support over the last year :)


Friday 28 October 2011

17 Magnetized polish in Teal

So, here is the last installment of 17's Magnetized polish...better late than never!

 Teal.


I only bought these two colours but there are three more available. I don't know how long these are going to be out for but I have a feeling I'll be grabbing some more of them soon. 

xx


Monday 24 October 2011

17 Magnetized polish

Hey Friends!

Today I have an amazing polish to show you.  The idea of magnetic nail polish is not a new one; I know Essence and several other brands made polishes like this for some time, but a lot of them weren't actually available in the UK. Nails Inc recently came out a few colours, but this one was much cheaper.

This little gem from 17 came out some weeks ago. I found out about it on Twitter and was hunting for it for days after it was actually released, but to no avail.  Imagine my glee (yes, glee) when I found a stand full of these beauties on Thursday.

This is the blue.
So pretty. I really cannot fault it at all.

The formula is quite thick and the brush is flat and wide - this makes it easier to apply the polish in one stroke. I only used one layer.

How to apply:
  1. USE A BASECOAT!!!!
  2. Apply a generous coat of the Magnetized polish
  3. Take the magnet on the removable bottle cap and HOVER it over the wet nail polish for a few seconds.
  4. When the pattern has taken effect, remove the magnet, let the polish dry and marvel at your piece of art work!
The magnet.


I have another one of these for you in my next post.  If you like this polish, it's available at Boots (on-line and in store) and costs £4.99.

Oh, by the way, I picked these up myself and used my Advantage card to pay for them...

xx

Where do you get YOUR supplies - Viva la nails haul and review

Hey friends!

Where do you get your nail art supplies?

I usually go to my local beauty product chains or order on-line. I know that I may be preaching to the converted, but for those of you who are new to nail art/polish/care you may (or may not) find this post helpful. Hopefully, it's the former! I tend to buy a lot of my nail art supplies on-line but it tends to be from wholesalers who don't ask you to make a minimum spend.

Ebay is a very good source, as is Amazon. If you find a reputable seller you can buy at a good price with fast delivery and a great service. You can also get burned if you are not careful; try having a look at the scores and reviews of a vendor before purchasing (if you are new to either of those Internet market places). If you are into adorning your nails with shiny things that can be glued on, you could also take a trip to a craft store such as Hobbycraft - you may just find what you are looking for there.

There are a few popular on-line stores that are good.  I have found Catherine Arley polishes here and they are as cheap as chips.  Beauties Factory UK seem to have some good items and you can shop wholesale if you want to. I haven't ordered from them yet, but I've got my eye on a few items which I may treat myself to soon...Christmas IS coming and I've been a very good girl.

I have put in my first order with Bornprettystore and I'm waiting for my delivery. When I get my parcel, I'll let you know what bought. A lot of bloggers seem to use this site and again, they do have some nice items. If you like what you see, use this code: TENOFFK31 and get 10% off your order. As they are not based in Europe, you won't get next day delivery, but they offer free international shipping, so that makes up for the wait!

In the meantime, let me tell you about Vivalanails. I've used this site on several occasions to buy my nail art supplies, partly because the price is reasonable and also because they sell my beloved nail art magazines which are so hard to find in the UK. Don't let the web address fool you though, they are based in Latvia, not the UK! This means you won't get your shipping the next day or the day after that, but their prices are very reasonable and service is great. They also give you the opportunity to review some of their items for the price of postage alone. Now, as I love a good nail sticker, I couldn't pass up THAT opportunity!

First, let me show you what I purchased...
 Skeleton leaves (which you could find at a craft store in larger quantity...and at a higher price), water decals and flower stickers.These stickers were in the bargain section for about 45p! I love these rhinestones too-the first I've seen like this. I also bought a blade with a safety covering to cut my fimo canes and another glossy Japanese nail art magazine - these aren't pictured.

Below are the water decals and stickers that I got for review purposes:
 The ones on the black card are sticker and the others are decals. I didn't get to take a picture of the ones I used *slaps forehead*.

These butterfly decals are too cute. If you don't already know what to do with these water transfers I'll tell you. The images come attached to a piece of backing card. There is also a thin piece of plastic top sheet which is there to protect the images.  You will need to soak the images off the backing card, in order to apply them to your fingernails. 

After removing the plastic top sheet cut out the card with your desired image on it. Place the card into a bowl of water for a several seconds. When you remove the card from the water, you should find that you can easily slide the image off. Don't do this all at once though, the image may end up sticking to itself. Instead, slide only half the image off the card. You can apply that part of the image onto your nail and slide away the rest of the card after the image is in the desired position. Add a top coat and you're good to go.

I love water decals - especially these ones.  They are flat, easy to use and leave you with a smooth finish. These ones are quite sturdy too and don't take a lot of soaking to get the image off either. I put one to soak, went off to get a cuppa and when I got back, the card had sunk to the bottom of the bowl and the butterfly was floating on the surface of the water. As a result, it stuck together when I tried to fish it out with an orange stick...but putting it back into the water made it un-stick again! Good stuff.

In the review pack were some self-adhesive stickers:


Removal was hardcore too. I rubbed and rubbed with my trusty non-acetone polish remover but the only thing that came off was the polish surrounding the stickers. I had to scrape the stickers off with my thumbnail and then remove the residual polish. This probably wouldn't have been an issue had I used some acetone, but I don't generally like to use it unless I am using acrylic/glue/layered glitter.

Overall, I liked both products, but the water decals were by far my favourites.

Do you know of any good retail sites that are either based in Europe or ship internationally? Perhaps you could supply me with some nails and I can try to make a directory page...what do you think?

xx


Saturday 22 October 2011

Miracle Growth experiment....


Friends, I've trimmed my nails because I was getting tired of having to patch up tears with every change of polish.  I've bashed and bent my nails so much of late, even after a trim a few weeks back; I'm looking at damage on practically every nail :(

So, in a bid to grow my nails out again, I've been looking for a growth accelerator.  I bought this...

Hmm. '59% Longer nails!' in two weeks apparently.  Let's not worry about the 9%  - 50% is good enough for me.


My nails tend to grow about 2.5-3mm every two weeks. I know this because I used to get my acrylics filled in twice a month and usually had this amount of growth. So if I use this, by two weeks I should have between 3.75-4.5mm of growth? Really?!! This may not seem like a lot, but it makes a big difference if you have a painful break that you want to get rid of!

Moisturising and massaging can stimulate nail growth and so can drumming your fingers every so often
but I want to see if any of these growth solutions give you visibly faster growth. So, for the next two weeks I will apply one drop of this clear, non-greasy serum which has the consistency of a gel, to each cuticle. The package doesn't specify how many times a day it should be used, so I'll do it before bed and one other time during the day. After massaging the serum in, I'll moisturise my nails in the normal way (with any old cream I can lay my hands on).
In two weeks time, I'll make a post about my progress...

Here are the starting pictures:
 16/10/2011
19mm
I've measured from cuticle to tip because it wouldn't be so accurate measuring the free edge.

Wish me luck eh? I hope that it DOES work - this bottle cost about £10!!

xx

Friday 21 October 2011

Catherine Arley HOLO swatch

Hey, hey!

Recently I managed to acquire several Catherine Arley Holographic polishes. I ordered them aaages ago, but they were all out of stock due to other bloggers swooping and clearing out stock. Yep, some of you guys made me wait!  Not to worry, I have them now and I'm HAPPY.

This is 677


Glorious, right? I can't express how much I love nail polish that sparkles, shatters, changes, shimmers, and mattifies. I have a few more of these pretties languishing in my Helmer so, I'll be back with those at some point.

Take care and thank you for reading.
xx

Monday 17 October 2011

MUA Nail Quake and The Evil Step-mother...

Hey everyone.

Over the last few months I have noticed more and more companies jumping on the crackle band wagon. To be honest with you, I don't know why it has taken them so long. Is there a secret method of creating 'le crackle' that is stuck in volt somewhere guarded by the hounds of hell? Why has it taken everyone so long to 'crack' on? <<<<Did you like what I did there?

Any hoo, here is MUA's Nail Quake and I actually really love this colour. Before I go on, I saw this polish out ages ago, so no, MUA were not tardy to the crackle party. I used this over a gold colour by Nails Inc.


I got the inspiration for this manicure from Rodgers and Hammerstein's Cinderella featuring Brandy Norwood, Whitney Houston and many other famous US celebs. Confused?

 If you would like to see my inspiration but don't want to watch the entire clip, scroll to 7.50 mins and checkout the Evil Step-mother's dress...otherwise, enjoy!


Friday 14 October 2011

Beetlejuice, Beetlejuice, Beetlejuice (and a little tutorial)!

Hey all!

I promised that I'd be back with my second manicure. This is it, inspired by the movie 'Beetlejuice'.  Admittedly I'd had high hopes for this mani but after all the work doing just one picture of Mr Beetlejuice, I got fed up and didn't finish it.


First,  I painted my nails black with this un-named polish and then put free-hand stripes on with white acrylic paint.  I made a sticker for the face by doing the following (something I saw Amanda do aaaages ago with little hearts):

I let two layers of clear polish dry on a sheet of plastic (you could also use a freezer bag)

I painted on the design after seeing  it on the internet. I started with the white egg shape first and then just built everything else up around it.

I then peeled the design off carefully and applied it to my thumb nail with a little clear nail polish.

Okay. I used a lot of clear nail polish...once again, my generous application caused bubbles. I also should have cut away as much of the hardened clear polish as I could - this would have reduced the bubbles.

I enjoyed wearing these stripes for a day. I think I may do another striped design at some point, but in more subtle colours...so I can wear it to work.
Have a lovely weekend.

xx

Wednesday 12 October 2011

Pumpkins!

Hi everyone (and a big hello and thank you to my new subscribers!)

As it's coming up to Halloween, I thought I'd try some Halloween themed manicures.

 This is a free polish that I got with InStyle magazine back in the Summer. I actually really like this colour! I also used some black acrylic paint and some fimo slices.  I sliced these myself and can I just say...it is so easy. Previously I'd been put off buying these things because I thought they'd be difficult to slice. Not so. If you use a sharp blade or craft knife, they slide right through the canes.

I got a bit slap-happy with the top-coat and as a result, there are about a million air bubbles in there. I took this off right after I took the pictures, so it literally only lasted for the night.


So far I've done two creepy manicures and I'm not overly proud of either :) I'll show you the other one in my next post...

All the best,

xx