Showing posts with label stamping. Show all posts

Friday, 25 May 2012

Bubbles

Evening folks.

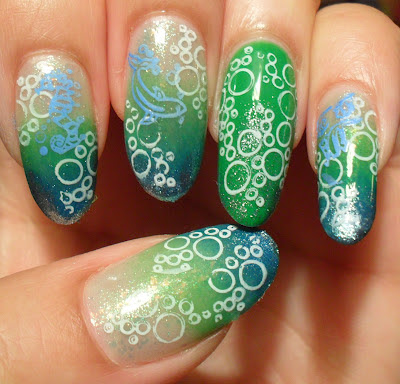
Tonight I want to show you a bit of stamping that I did recently.

 The plates used were B06 and B10 from KKCenterHk

I'd had intentions of painting the fish in their respective colours, but at that point I was lacking the will and the patience. The white stamping polish didn't want to work with me, hence the reason why some of the bubbles look more like semi-circles! The images on the plates were crisp and clean, so yes, I do think I need to replace my polish.

This is one of those manicures that looked a lot prettier in my head...ho hum.

Have a brilliant weekend all...and wish me luck for my last day at college tomorrow (sob, sob).

xx

Saturday, 17 March 2012

Sometimes, you just have to leave things alone

I'm really behind with my manicures. I have about four different ones that I've taken photos of but have yet to edit.

I was wearing the very lovely Catherine Arley '805' holographic polish recently:

This was taken by artificial light at night.


The holographic qualities are far more striking in real life but the camera couldn't capture it.

 Later that night, I got the amazing idea to stamp the living daylights out of this polish.  It looked alright before I went to bed, but in the harsh reality of daylight, it was a DOOZIE. It was fine until I put the black and white feather-looking images over the flowers.  Why didn't one of you stop me?!
This is a prime example of over zealous stamping.  Sometimes, you just have to leave things alone.

See? This is my right hand. Perfectly fine and not busy and crazy looking like her counterpart.

Oh well, I'm glad I could share my doozie with you :)

Thanks for reading.

xx

Sunday, 18 December 2011

Tutorial: Nail art stamping - lots of pictures!

Hey everyone, I hope you are well.

I've listened to what you've said and have made a pictorial to let you know how I create manicures with nail art stamping.  I'm sure other people have their own special techniques, but for those who are interested, here is how I do it.

I must apologise for the photographs; some were taken in natural light and others under the orange light of my kitchen. They aren't optimal conditions, but I did the best that I could....

First, start with your favourite base colour OVER A BASECOAT. Don't scrimp on the basecoat if you don't want stained nails. This is 'Purple Diamond'.

Sponge on your second colour. Put some polish on your sponge and dab it off onto a paper towel, then dab your nails, starting on the very tip first and then working towards the middle of the nail.

Sally Hansen's 'Red Carpet'.

Add a layer of glitter! This is 'Pinky Glitter' and these three gorgeous polishes were given to me by Marisa at Polish Obsession in a swap we arranged recently.
Use a layer or two of top coat over the glitter to smooth out the surface after the glitter. Doing this helps your stamping pattern to look like it's 'floating' on your nail. That's the preparation done.

Materials to use are a stamping polish or a highly pigmented regular nail polish, stamper, scraping knife and image template. You can get a starter kit from various places. I got my first a year ago here. Bundle Monster does fantastic plates for a fraction of the price Konad charges.

 Cover your chosen image with polish.

 Scrape away the excess polish.

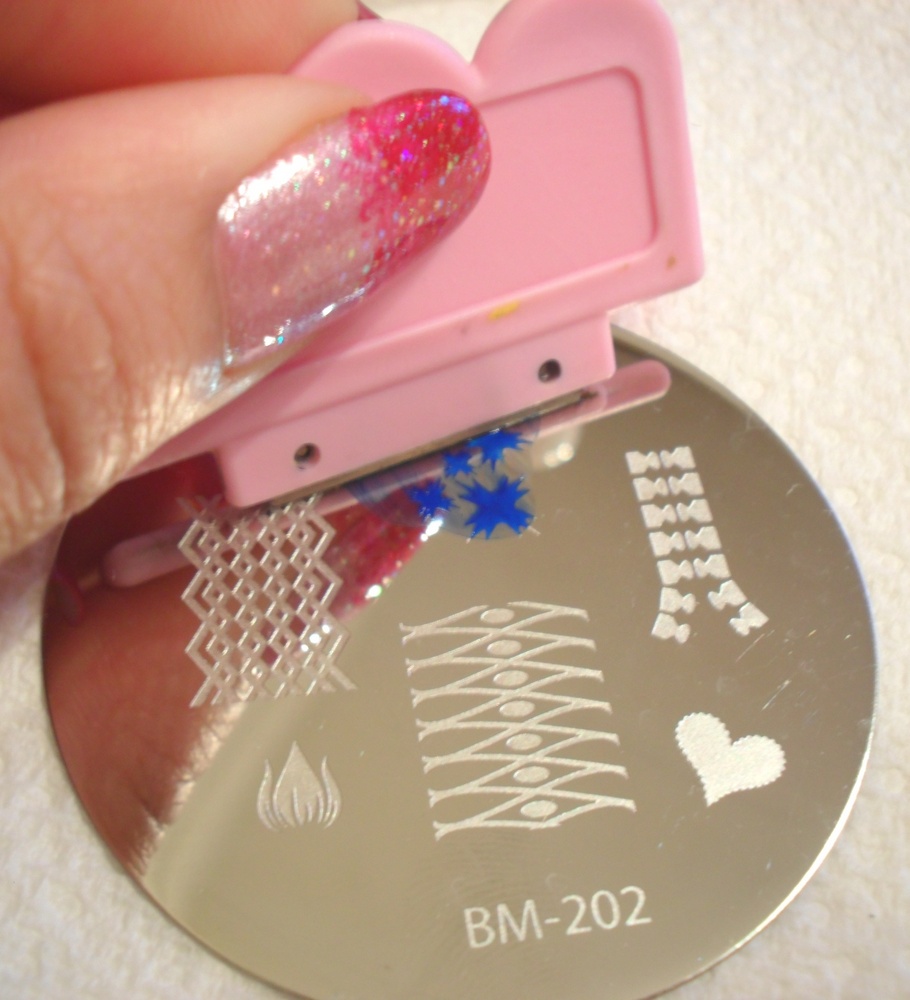
Immediately roll the stamp onto the image...

 When you remove the stamp, the image should be transferred onto the rubber.

 Blue didn't go with the polish I was wearing so I tried again with a white 'special' polish from Konad. This polish IS good, but sometimes you can get a normal polish that is cheaper but just as effective. MUA does brilliant black polish which only costs £1.

Position the image and slowly roll it onto the nail with a little pressure. Roll it all the way over to ensure that the image is transferred. It should transfer nicely but if it doesn't, lightly swipe the image off your nail with a cotton bud dipped in nail polish remover. If you covered your main polish with a top coat, you shouldn't have any issues with smudging.

Cover your nail with a clear top coat. Put a big drop of polish on your nail and try not to let the brush touch the nail when doing so. Don't worry if you flood your cuticles with polish at this point - you can remove it later.

 Finished product!

I tried my very best to make this as concise as possible... 

This is what works for me - what do YOU do?

Thanks for reading folks, I'm off to bed :)

xx


Tuesday, 6 December 2011

Nude glitter stamping... and what I'm listening to right now.

Hello friends, how are you tonight? 

I'm sat here listening to British recording artist called Daley and editing my pictures. Doesn't sound like much? Well, simple things please me. Like turning the television off and putting some music on the iPhone. Or listening to a CD. Yeah, a real CD. Or even finding an old cassette tape (hands up if you still have one of THOSE!)  Anyway, I'm going to pop the YouTube video of this guy at the bottom of my post so you can enjoy the evening with me.

Right, nail time!

 Here is The Face Shop's Number BR802 with Peripera's P040 (glitter) and leaves from plate BM208. I did this last night.

Don't you hate it when you do your best to stamp a nice, clear image...only for your cruddy top coat brush to drag and streak it?

I have a few tips for you when you are stamping (if you don't already do these things).
1. To minimise streaking, put a put a dollop of polish on the brush and float it down over your nail. DON'T LET THE BRUSH TOUCH YOUR NAIL.

2. To make it easy to remove a messy image without ruining your base polish, make sure you use a top coat on your base colour BEFORE stamping over it.

3. Have a cotton bud and cotton wipe readily soaked in acetone or polish remover to clean your stamper or remove part of an image you don't want, before putting it on the nail.  You can also use a small brush dipped in solution to do this.

These tips are in hindsight...had I thought about it before, the manicure would have been tidier.

You could also change this design by turning it into a french manicure. Start with clear base nail bed, and use the colour, glitter and stamping on the tips. For effect, you cour outline the 'smile line' with some...

...metal balls (if you want too see this old manicure, click here)

By the way, one of you lovely ladies made me think today. 
Do you want to see more tutorials (step-by-step pictures) when I do stamping, or are you happy for me to just tell you what I did? A lot of you ladies are pretty proficient in your stamping already, but what about you readers who don't have blogs or are new to nail art stamping?

Have a listen to Daley and let me know in the comments box.

xx

Sunday, 4 December 2011

Milani Neon Pink and a little tutorial

Hey friends.

I'm taking a little break from checking giveaway entries to post a manicure that I did prior to the 31 Day Manicure Challenge.  

If you follow me on Twitter (click my button >>), you will recognise this manicure - it's my twitter icon.


I started doing this when it suddenly occurred to me that I should actually do a tutorial just in case anyone was interested. 

Ready?
Okay!

1. Start with completely dry nails in the colour of your choice. Tape some thin strips of tape in random places on the nails you want to accent.

2. Paint over the tape and let it dry completely.

3. Choose your stamping image - I chose the top left full image on plate M60 bought from Bornprettystore. This plate was actually in the sale and was a little over $2...you KNOW I love a good discount :-p

4. Use white stamping polish to stamp on the image. This was easy to do, because the images on the plate were clean cut and deep. As a result, I was able to get the whole image to transfer onto the stamp in one attempt.

5. When the polish is completely dry, SLOWLY remove the tape and add some random lines of glitter.

6. Slap on your favourite top-coat and you are good to go!

I hope you like it.

xx

Tuesday, 29 November 2011

31 Day Manicure Challenge Day 29 - 'Nails inspired by the supernatural'

Oooh, helloooo.

How's it going everyone?

Tonight I'm feeling a lot better and have a bit of energy for a change!  The challenge for today was to create a manicure inspired by the supernatural. I decided to hunt down my matte top coat specifically because I haven't used it for so long.

This is a random polish my husband picked up for me at our local pharmacy. He told me that he and the kiddie were deliberating for ages as to which colours to get for me :)

The red was layered with a pink hexagonal glitter (by Peripera), then layered with Nfu-Oh 50, stamped with Models Own 'Gold Digger' (using BM 223), then mattified with Rimmel Pro Matte Finish. It's not awful...could be worse!

Boo!

xx


Sunday, 27 November 2011

31 Day Manicure Challenge Day 27 - 'Nails inspired by art work'

Today's inspiration is supposed to be taken from 'art work'. I chose not to go for an artist who dabbles in paints and canvas - instead, I took inspiration from a friend and the works of art that she regularly creates.  If you like sweet treats, you might want to visit Dewbien of Bailey Ana Cakes.

Here is my manicure inspired by the artistic goodies:

Not a stitch on the real thing though...

Gorgeous right? All I can say is that the birthday girl must have been very, very happy when she saw this!


Tomorrow's inspiration is a flag...
xx

Saturday, 26 November 2011

31 Day Manicure Challenge Day 26 - 'Nails inspired by a pattern'

Good evening ladies (and gents).  Tonight's manicure is based on a pattern that can be found on a Folli Follie bracelet.

This is a Beauty UK mini - it doesn't have a name or number.
Here is my inspiration.  It's £73...but whilst the main body is resin, the motif is rose gold plated. I wouldn't turn it down if it was bought for me, but I'd rather by polish!


The plate used was BM03.

Meh.

A quick reminder for you. If you haven't entered my giveaway, you have four days left!!

xx

Friday, 25 November 2011

31 Day Manicure Challenge Day 25 - 'Nails inspired by fashion'

Evening all.

I'm not really a follower of designer fashions, but I was thumbing through a magazine prior to this challenge and I found some pictures of Dolce and Gabbana's 'Galactic' print:


I tried to replicate Fergie's dress:
Yes, Yellow Peril makes another appearance as a base colour and also a stamping colour too.


Excuse the smudging - I was a little too hasty methinks.

Would you wear this print (as an outfit, not a manicure)?

xx


Tuesday, 22 November 2011

31 Day Manicure Challenge Day 22 - 'Nails inspired by a song'

Good evening my dears.

Tonight's challenge installment is inspired by a song...Follow the Yellow Brick Road from The Wizard of Oz. I know. Of all the songs in the world, why that one? Because my husband chose it and the fact that he's interested in the challenge really makes me smile.

Beauty UK's 'Yellow Peril' with stamping from the S5 plate.

I was trying to find a plate with a brickwork image on it but I didn't have one...but I bet 'The Kween of Konad', Sarahlouise has a few in her stash though! I had to settle for something that looked like dry, cracked earth.

Stamping was uber sloppy for a number of reasons...carelessness being the main one.

See ya to-marrah!


xx

Thursday, 17 November 2011

31 Day Manicure Challenge Day 17 - 'Glitter'

It's Thursday!

Today is glitter day and I have some abismal photos to show you. It was so dark this morning that I couldn't take any pictures before I left for work. I chucked a bottle of polish and my camera into my handbag and decided to take the pictures on my lunch break.

Oh dear.  I was sculking around the back door, squinting, changing light settings and posing the polish bottle so as not to cover the label with my fingernails, whilst at the same time I was trying to act natural just in case someone caught me acting like a weirdo. With all the jumping and rushing, every photo I took was pants...apart from two.


 I started with Models Own Pro in 'Midnight Blue'  bought in Boots at Brent Cross. The picture does the colour no justice and I will get around to swatching it properly at some point. I then layered a gradient of OPI's 'Absolutely Alice' and Sinful Colors 'Frenzy'. When I had finished, it was so bright, I would have caused a distraction in a very, very serious meeting I had at work, so I tried to dampen the bling (oh, how I hate that word) with some stamping.


I used a blue Konad special polish and BM plate 201.

I'm not so fond of this one, but I was rushing and didn't have time to do it the way I would have liked.

xx