Showing posts with label tutorial. Show all posts

Thursday, 16 February 2012

Hand-painted lace effect manicure.

Today I have a tutorial for you. 

I was thinking of creating a black lace manicure, but couldn't find any lace that I really liked. That's when I decided to try free handing a lace pattern onto my nails. 


Things you will need:
You will need a base polish. For the life of me, I have no idea what this Barry M polish is called. It's an old one and it is less than half full now. The glitter is number 70 by Catherine Arley. The acrylic paint is non-specific and I actually changed the brush for a thinner one because the lines were just too thick.

 Two coats of base colour and one coat of glitter.

 Create some waves with the black paint.

 Make diagonal lines but don't panic if your lines aren't straight. You can use the wonky lines to prove to people that yes, you did the design YOURSELF!

Add some dots for detail. I actually used a tooth pick because the dotting tools I have are far too big.

Add more detail with the paint brush and when the acrylic is dry, use a top coat.

L-R: '276' with no name and '308-Berry Ice Cream'
I told you that this bottle of polish was old. Look at the worn print - the font size has even changed on the newer bottle.

I hope you enjoyed this tutorial.

Have you ever worn a 'lace' manicure? What have you used to recreate the 'lace' effect? Would you like to see more of these types of designs in future?


xx

Sunday, 18 December 2011

Tutorial: Nail art stamping - lots of pictures!

Hey everyone, I hope you are well.

I've listened to what you've said and have made a pictorial to let you know how I create manicures with nail art stamping.  I'm sure other people have their own special techniques, but for those who are interested, here is how I do it.

I must apologise for the photographs; some were taken in natural light and others under the orange light of my kitchen. They aren't optimal conditions, but I did the best that I could....

First, start with your favourite base colour OVER A BASECOAT. Don't scrimp on the basecoat if you don't want stained nails. This is 'Purple Diamond'.

Sponge on your second colour. Put some polish on your sponge and dab it off onto a paper towel, then dab your nails, starting on the very tip first and then working towards the middle of the nail.

Sally Hansen's 'Red Carpet'.

Add a layer of glitter! This is 'Pinky Glitter' and these three gorgeous polishes were given to me by Marisa at Polish Obsession in a swap we arranged recently.
Use a layer or two of top coat over the glitter to smooth out the surface after the glitter. Doing this helps your stamping pattern to look like it's 'floating' on your nail. That's the preparation done.

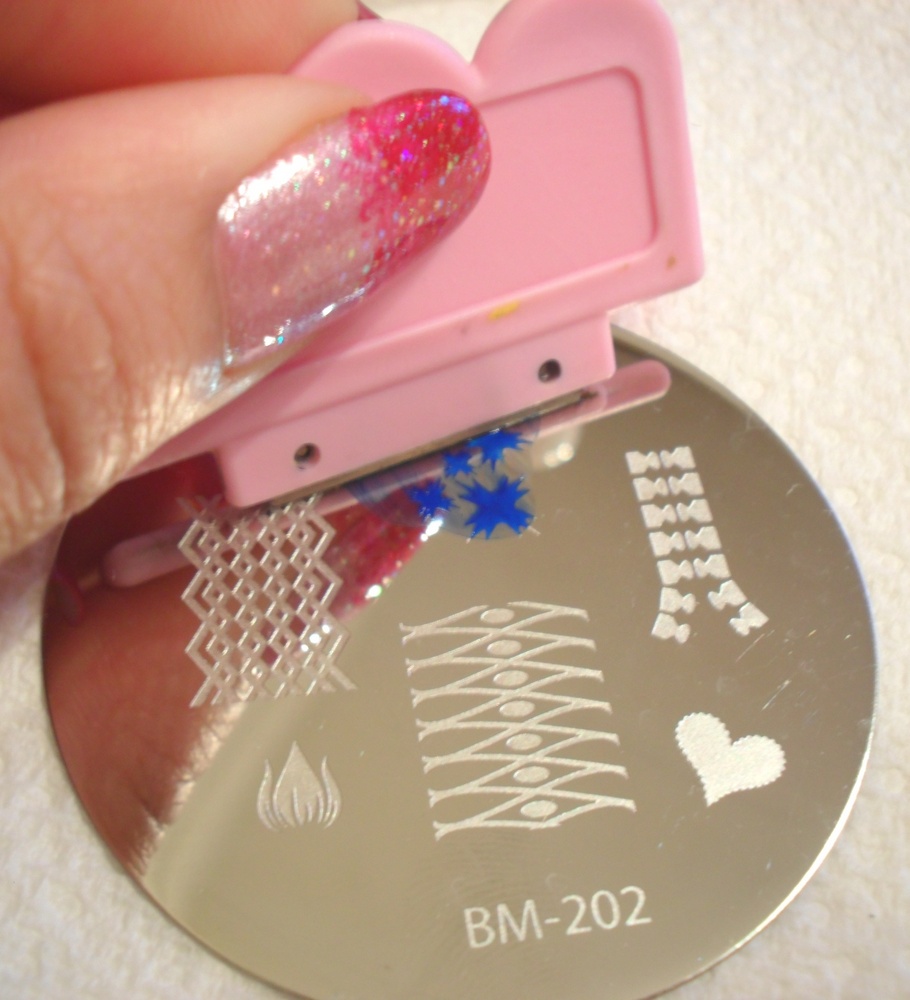
Materials to use are a stamping polish or a highly pigmented regular nail polish, stamper, scraping knife and image template. You can get a starter kit from various places. I got my first a year ago here. Bundle Monster does fantastic plates for a fraction of the price Konad charges.

 Cover your chosen image with polish.

 Scrape away the excess polish.

Immediately roll the stamp onto the image...

 When you remove the stamp, the image should be transferred onto the rubber.

 Blue didn't go with the polish I was wearing so I tried again with a white 'special' polish from Konad. This polish IS good, but sometimes you can get a normal polish that is cheaper but just as effective. MUA does brilliant black polish which only costs £1.

Position the image and slowly roll it onto the nail with a little pressure. Roll it all the way over to ensure that the image is transferred. It should transfer nicely but if it doesn't, lightly swipe the image off your nail with a cotton bud dipped in nail polish remover. If you covered your main polish with a top coat, you shouldn't have any issues with smudging.

Cover your nail with a clear top coat. Put a big drop of polish on your nail and try not to let the brush touch the nail when doing so. Don't worry if you flood your cuticles with polish at this point - you can remove it later.

 Finished product!

I tried my very best to make this as concise as possible... 

This is what works for me - what do YOU do?

Thanks for reading folks, I'm off to bed :)

xx


Tuesday, 6 December 2011

Nude glitter stamping... and what I'm listening to right now.

Hello friends, how are you tonight? 

I'm sat here listening to British recording artist called Daley and editing my pictures. Doesn't sound like much? Well, simple things please me. Like turning the television off and putting some music on the iPhone. Or listening to a CD. Yeah, a real CD. Or even finding an old cassette tape (hands up if you still have one of THOSE!)  Anyway, I'm going to pop the YouTube video of this guy at the bottom of my post so you can enjoy the evening with me.

Right, nail time!

 Here is The Face Shop's Number BR802 with Peripera's P040 (glitter) and leaves from plate BM208. I did this last night.

Don't you hate it when you do your best to stamp a nice, clear image...only for your cruddy top coat brush to drag and streak it?

I have a few tips for you when you are stamping (if you don't already do these things).
1. To minimise streaking, put a put a dollop of polish on the brush and float it down over your nail. DON'T LET THE BRUSH TOUCH YOUR NAIL.

2. To make it easy to remove a messy image without ruining your base polish, make sure you use a top coat on your base colour BEFORE stamping over it.

3. Have a cotton bud and cotton wipe readily soaked in acetone or polish remover to clean your stamper or remove part of an image you don't want, before putting it on the nail.  You can also use a small brush dipped in solution to do this.

These tips are in hindsight...had I thought about it before, the manicure would have been tidier.

You could also change this design by turning it into a french manicure. Start with clear base nail bed, and use the colour, glitter and stamping on the tips. For effect, you cour outline the 'smile line' with some...

...metal balls (if you want too see this old manicure, click here)

By the way, one of you lovely ladies made me think today. 
Do you want to see more tutorials (step-by-step pictures) when I do stamping, or are you happy for me to just tell you what I did? A lot of you ladies are pretty proficient in your stamping already, but what about you readers who don't have blogs or are new to nail art stamping?

Have a listen to Daley and let me know in the comments box.

xx

Thursday, 8 September 2011

Practice makes perfect.


Hellooooooooo and kisses to my readers (seasoned and brand-new)

School is back in and the weather has started it's steady decline. I shudder when I see conkers on the ground, because it means that the leaves are soon to follow...and the rain will start.

Speaking of school, my 6-year-old started back at school on Wednesday and was a little concerned about the 'difficultness' of the new work she will have to do. The extra long words in her spelling tests, new sums, new kids, a new teacher; all of these things were making her nervous.  I told her that if there is something new that she doesn't get right straight away she shouldn't panic. She's a Leo though, so failure is NOT an option for her. Daddy and I tell her regularly that 'practice makes perfect' and now, this is her mantra. She yelled this at me the other day when she swung back and forth on the monkey bars that used to taunt her at our local park.

So what does this have to do with nails?

I don't know about you, but I usually start off my manicures by staring at my nails for ages and then adding bits until I come out with a good (or bad) result.  Quite often, the manicures are wrong 'uns so I don't post them! Surely if I actually PRACTICED the design first, it would reduce the likelihood of creating a doozie? I think so.

Here is what I've done so far.

L-R Bubble Hearts, Pearly Blouse and Polka Heart

L-R Okay, so the first one IS a doozie (lol) and the second is Coral Floral

I liked Coral Floral so I tried it again and came up with the below:

I think they look better than the original.

So, if you are like me and marvel at the gorgeous designs some other blogger's are producing, just remember that they make doozies too. Whilst some are born with an artistic flair, others (like moi) have to work towards one! Keep watching those tutorials and practicing your designs!!

xx


Monday, 8 August 2011

Hand-painted Blossom tutorial

Hello friends, how are you?

At the moment we are in the midst of riots in London (which have also spread to Birmingham and Leeds...so far). I'm not going to go into the negativity that has caused it all, so this post is intended to lighten the mood a little.

Today I have a tutorial for you.


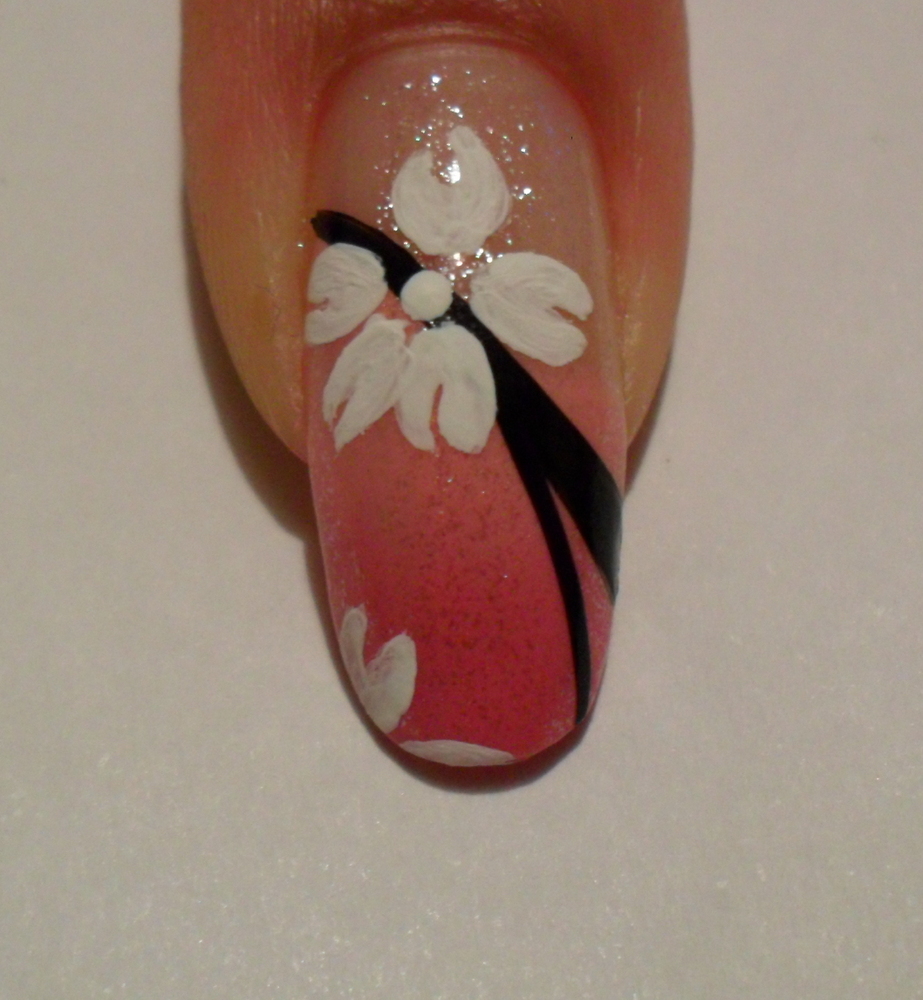
This is my hand-painted flower design.

Here's the tutorial:

1. Start with bare nails and add two layers of Claire's Mood Polish in 'Awesome/Silly' to the tips. Yes, I'm showing my right hand!!!!

2. Add a layer of Sally Hansen's Diamond Strength in 'Diamonds'.

3. Add black stripes with nail polish.

4. Add a dot of white acrylic paint as a guide to the centre of the flower.

5. Start your petals off as'U' shapes. This was the easiest way for me to do it.

5. Fill them in.

6. Add stripes of red paint to make your petals look like petals, lol!

7. Add dots of clear nail varnish to the centre of your flower, wait for it to become tacky and then dip your nail into some gold coloured balls.


I hope you liked the design. I'm sorry the pictures of the steps were so amateurish - I painted my nails at night and I was too tired to get the light box out to take pictures. 

xx