Showing posts with label Water Decal. Show all posts

Tuesday, 5 June 2012

Foil me once, foil me twice

Hey everyone.

It's been the Queen's Jubilee weekend here in the UK and I've been pretty busy and also a bit under the weather (story of my life really).  I've now got a few manicures backed up, waiting to be posted, but rather than bombard you with them I will space them out.

A few weeks ago I tried my first ever foil manicure. It was a big fail. When I originally put it on, it had looked stunning. I then added a normal topcoat and the foil crinkled up like used Bacofoil. One of my Twitter buddies suggested that I actually use a special foil topcoat and this gave me the excuse to go to eBay and buy things!  I found Jennysellsfoils and ordered a topcoat by Kami from Jenny - the vendor. After I'd paid, I got a long automatic email back from her, giving instructions on how to use foils etc. I replied to the email thanking Jenny for her instructions and mentioned how frustrated I'd been...and she emailed me back again with even more tips. Talk about customer service! The topcoat also reached me the following day, along with a few sample foil strips, so I was pretty chuffed.

Here's the manicure:
'Tropical Sunrise' and the Kami Foil Topcoat.

 I put the foil on over a glitter base colour.


 'Tropical Sunrise'.

I do actually have a tutorial on how to use foils and I'll post it soon.

Have you used foils before? How did you find them?


Sunday, 13 May 2012

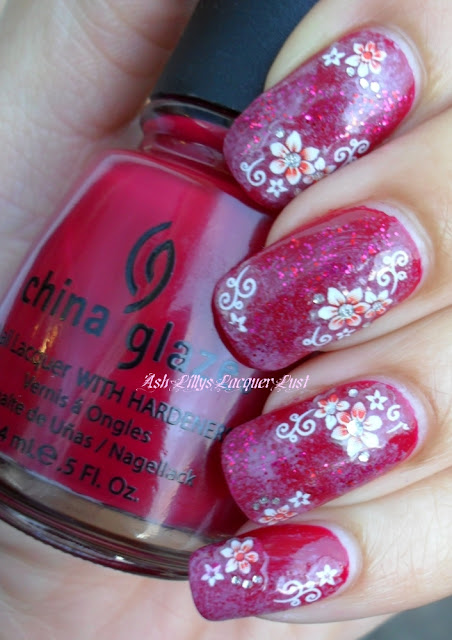
Floral water decals.

Happy Sunday friends...and a happy Mother's Day to those who are celebrating today.

Although we celebrated Mother's Day back in March in the UK, I actually saw my own mum (after quite a long time) along with my siblings and niece today. I cooked up a big dinner and everyone seemed to have a nice day catching up. 

I'm now sat here typing with two nubbins and three nails with low breaks on them. Usually, I'd be lamenting this but I'm actually pleased to have a reason to get some UV gel out and start practising with it. You may even find that I hack my nails off and replace them with same falsies - I'm not sure yet!

I was wearing these full water decals from KKcenterHk on Friday:


You will already know about my far from secret love affair with water decals. I have less time to myself nowadays and I suffer from a chronic condition that has been kicking my behind for some months (which makes me exhausted a lot of the time), so I appreciate a 'quick fix'.  I have several sets of decals that are similar looking, but it is the first time I have tried this brand.

This is NOT 'actual polish'. It's a decal, okay. It's a lovely pattern, but it is not different from the other decals I have used.

My fingernails are wider than the decals but I could have put on a colour which matched the decals beforehand. I didn't bother though.

The packaging stated that these could be worn for up to seven days with a topcoat. Unfortunately, they were chipping and peeling on me by the end of the day despite two layers of topcoat. Yes,  I did wash up without gloves, but I really didn't think that this much deterioration would have taken place so soon:

I'd hoped that I could have gone to college with gorgeous nails on Saturday morning but alas, I had bare, stained broken talons. My clients asked me why my nails were bare and I was actually quite embarrassed.  Unfortunately, on this occasion, water decals didn't come to my rescue.
*product sent to me for review

Have a happy start to the week folks ;)

xx

Monday, 2 April 2012

Water marble water decals.

Hello friends!

I've reached over 800 readers via Google Friend Connect and I'm so chuffed. Thank you all so much for visiting, reading, viewing, commenting and following (in whichever way you do so). It really means a lot to me. 

Okay, to the nails we go!
As another demonstration of my love for water decals, I've decided to show you how I use them.

Now I know that some of you will be perfectly aware of how to use water decals, but I'm sure that there are some other readers who aren't so familiar with them.
 The decals are basically transfers that are attached to cardboard. These were sent to me for review, but you can buy them and other designs here at KKCenterhk.

I started off with a gorgeous pearl shimmer polish by Hard Candy. Sorry, I don't know the name of it because the label has come off!

 I cut off the pattern I wanted and let it soak for about 10 seconds.

At this point, I was able to press the card between my thumb and index finger and slide the transfer off the card. I personally only like to slide off half of the transfer and remove the rest of the card after I've positioned it where I need it; if you slide the whole transfer off the card, you run the risk of it folding up on itself. If does do this to you, put it back into the water and you may be able to straighten it out again.

 Place the transfer where you want it...

 Et voila!


These decals are quite clever. They look like intricate water marble patterns and I managed to fool a few people into thinking I'd created them myself with polish (only for a few seconds though - I'd NEVER try to fool people like that!). The only thing that annoyed me was that they smudged and nearly disintegrated when I used my Seche Vite top coat. I don't know if it was the polish or the quality of the decals, but I could only wear this manicure for a day because I could see where the pattern had been destroyed and I had started to obsess over it. Just a little.

Oh, and I bought this 'glow in the dark' top coat recently too.

 Erm. The polish glowed quite a bit after I 'charged' it by holding up to an artificial light...it didn't do too well on the nail though.

Probably not a polish I'll be using again in a hurry, I must admit.  I like the concept, but the formula was gloopy and took ages to dry. I chose not to use Seche Vite because I didn't want to dampen the 'glow' effect.

I hope this post was of use to someone and not just me trying to teach grandma to suck eggs (sorry).

Have a good week.

xx

Monday, 5 March 2012

Denim zippers!

Hey everyone.

I don't know how many of you have ever created your own 'zipper' manicure either by way of free-hand paint or with embellishments, but I have been meaning to try it for ages. I actually have TWO zipper images on some stamping plates, but up until now, I haven't used them. I'm not about to go into how many plates are sat here covered in the same blue cellophane wrapping I received them in.

Anyway, I digress.  I was contacted a while ago by Maggie at KKcenterHk and asked to review one of their items. Of course, I accepted...and guess what I chose?


Gold zipper water decals by N.Nail. Ahhhh yeaahhh.

I used the very beautiful Tristam by a-england as a base colour (two coats).  This polish was actually bought exactly a year ago and is still the only a-england polish I own.  If only the photographs could actually convey how lovely this shade it. The holographic qualities are amazing and it was PERFECT for denim manicure. The pink polish was from a nail art pen and I added a little glitter too.

 The water decals were spaced wide enough so that they were easy to cut and they didn't take long to detach from the card after soaking in water for a few seconds. I was pleased to see that they were sturdy and didn't stick together or tear when I removed them (yay!). There is nothing worse than a thin decal that sticks to itself when you remove it from the card! I am also happy to report that the decals did not disintegrate when I used my top coat either - I hate it when that happens as well.

These decals can be bought from KKcenterHk and they also come in silver (for those of you who prefer a less gaudy manicure). Feel free to use my discount code : BLGA402AS10 to receive a 10% discount if you want to make a purchase.

I was trying to make it look like there was pink underwear under that denim on my nails...I didn't do a very good job. Perhaps if I'd painted on a lace pattern, that might have helped. Not sure.

I actually really liked these decals (and you aren't surprised are you?).  I did draw a bit of attention to myself when I wore this, but then I got a little embarrassed and had to take it off.  I think the pink underwear idea was at the forefront of my mind when people were complementing me *blush*.

So would you have gone for zippers or something a little more sedate? Let me know your thoughts, as always.

xx

Leopard water decals and a little stamping too.

Hey friends.

I would love to tell you that today, I am wearing the below, but I'm not.  I did this over a week ago, and totally forgot about it until I found the pictures in my camera.

These are full cover water decals bought on Ebay.  You may notice that the index and ring fingers looks slightly darker - that's because I used two decals on those fingers due to tearing the first ones.

I can't express how much I love water decals that are big enough to cover your entire nail.  They don't take long to apply and because of their size,  I didn't need a base colour - only a base coat. To seal the decal onto the nail and add some shine, I used a top coat too. Simple, yet effective in my opinion.

I admit, I did get a little bored with the design so I tried stamping a design over it from BM plate 201 and wore it for another day.

Have you used water decals before? How did you find them? What about nail foils?

Monday, 24 October 2011

Where do you get YOUR supplies - Viva la nails haul and review

Hey friends!

Where do you get your nail art supplies?

I usually go to my local beauty product chains or order on-line. I know that I may be preaching to the converted, but for those of you who are new to nail art/polish/care you may (or may not) find this post helpful. Hopefully, it's the former! I tend to buy a lot of my nail art supplies on-line but it tends to be from wholesalers who don't ask you to make a minimum spend.

Ebay is a very good source, as is Amazon. If you find a reputable seller you can buy at a good price with fast delivery and a great service. You can also get burned if you are not careful; try having a look at the scores and reviews of a vendor before purchasing (if you are new to either of those Internet market places). If you are into adorning your nails with shiny things that can be glued on, you could also take a trip to a craft store such as Hobbycraft - you may just find what you are looking for there.

There are a few popular on-line stores that are good.  I have found Catherine Arley polishes here and they are as cheap as chips.  Beauties Factory UK seem to have some good items and you can shop wholesale if you want to. I haven't ordered from them yet, but I've got my eye on a few items which I may treat myself to soon...Christmas IS coming and I've been a very good girl.

I have put in my first order with Bornprettystore and I'm waiting for my delivery. When I get my parcel, I'll let you know what bought. A lot of bloggers seem to use this site and again, they do have some nice items. If you like what you see, use this code: TENOFFK31 and get 10% off your order. As they are not based in Europe, you won't get next day delivery, but they offer free international shipping, so that makes up for the wait!

In the meantime, let me tell you about Vivalanails. I've used this site on several occasions to buy my nail art supplies, partly because the price is reasonable and also because they sell my beloved nail art magazines which are so hard to find in the UK. Don't let the web address fool you though, they are based in Latvia, not the UK! This means you won't get your shipping the next day or the day after that, but their prices are very reasonable and service is great. They also give you the opportunity to review some of their items for the price of postage alone. Now, as I love a good nail sticker, I couldn't pass up THAT opportunity!

First, let me show you what I purchased...
 Skeleton leaves (which you could find at a craft store in larger quantity...and at a higher price), water decals and flower stickers.These stickers were in the bargain section for about 45p! I love these rhinestones too-the first I've seen like this. I also bought a blade with a safety covering to cut my fimo canes and another glossy Japanese nail art magazine - these aren't pictured.

Below are the water decals and stickers that I got for review purposes:
 The ones on the black card are sticker and the others are decals. I didn't get to take a picture of the ones I used *slaps forehead*.

These butterfly decals are too cute. If you don't already know what to do with these water transfers I'll tell you. The images come attached to a piece of backing card. There is also a thin piece of plastic top sheet which is there to protect the images.  You will need to soak the images off the backing card, in order to apply them to your fingernails. 

After removing the plastic top sheet cut out the card with your desired image on it. Place the card into a bowl of water for a several seconds. When you remove the card from the water, you should find that you can easily slide the image off. Don't do this all at once though, the image may end up sticking to itself. Instead, slide only half the image off the card. You can apply that part of the image onto your nail and slide away the rest of the card after the image is in the desired position. Add a top coat and you're good to go.

I love water decals - especially these ones.  They are flat, easy to use and leave you with a smooth finish. These ones are quite sturdy too and don't take a lot of soaking to get the image off either. I put one to soak, went off to get a cuppa and when I got back, the card had sunk to the bottom of the bowl and the butterfly was floating on the surface of the water. As a result, it stuck together when I tried to fish it out with an orange stick...but putting it back into the water made it un-stick again! Good stuff.

In the review pack were some self-adhesive stickers:


Removal was hardcore too. I rubbed and rubbed with my trusty non-acetone polish remover but the only thing that came off was the polish surrounding the stickers. I had to scrape the stickers off with my thumbnail and then remove the residual polish. This probably wouldn't have been an issue had I used some acetone, but I don't generally like to use it unless I am using acrylic/glue/layered glitter.

Overall, I liked both products, but the water decals were by far my favourites.

Do you know of any good retail sites that are either based in Europe or ship internationally? Perhaps you could supply me with some nails and I can try to make a directory page...what do you think?

xx


Saturday, 8 October 2011

Bye-bye Summer :(

Happy Saturday friends.

As I type I lament the change in weather.  Seriously, last week it was roasting and I was slathering the kids in sunblock. Today, I'm typing s-l-o-w-l-y because my fingers are stiff from the cold. No, I'm not outside. I'm in my front room.

This manicure was done when it was hot - you can tell from the sunshine in the earlier photos. I was trying to capture the beginning of Autumn and the end of summer...

This is a mini bottle from Beauty UK. I couldn't find a name or number the bottle.


It's got lovely little golden particles in it.

I sponged on some Sally Hansen's Golden Cinnabar (which is more like a golden/bronze) and put on some Sunflower water decals by Viva la nails.

Sunflowers in Autumn.

I went and broke a nail on my right hand!!

 I fixed it with a nail tip and acrylic powder/liquid. I don't know how long it will last because I didn't use a primer (to remove the natural oils from my nail surface and adhere the acrylic to my nail properly). I'll have to do it properly though, I can't be bothered with putting a new false nail every so often!

What colours are you going to be wearing this Autumn/Winter? Do you go for season-specific colours or wear neons in the middle of November? :)

xx
 

Monday, 3 October 2011

More full nail water decals

Hey, all. Happy Monday!

Just a quick post about some water decals I wore a few weekends ago. I didn't really want to take them off either because they last much longer than plain varnish. I think that's probably to do with the fact that they don't chip easily.  If you like the look of a bold nails, they are perfect because they take a fraction of the time constructing a free-hand manicure would. 


My cuticles are flooded with a load of top-coat because I was in a hurry.  My only gripe with these things is that they are not wide enough to cover my nails from side to side. There is always this annoying 1 mm of bare nail on either side! I suppose that this could be remedied by painting the very sides of the nail with a colour that is similar to the decal though.

Hope you likey!

xx

Monday, 15 August 2011

Water decals

Hey friends. Guess who found their USB cable?

This is what I'm wearing today - full cover water decals. I absolutely LOVE these!


I'm selling a few of these in my shop

All I did was use one layer of basecoat, choose the correct sized decal for a nail, cut it out and put it in a bowl of water. After a few minutes, I was able to slide the design off the cardboard and put it on my nail. I then filed of the excess and put on two layers of topcoat afterwards. If your nails are longer than mine, they would still fit you - I had over 5mm excess design left after application. They were very easy to apply and slid of the cardboard with ease when they were wet. The decals were also pretty sturdy, not like some that just disintegrate when polish touches them. I've now been wearing these for a full day...so far, no chips.

Ah, I've also re-shaped my nails. The are more square now. The oval shape was getting on my nerves.
Below is a picture of what they looked like before the squaring and decal-ing!

Happy Monday folks!

xx

Friday, 11 March 2011

Nails Inc and water decals

 Hi again friends.

As I said in this post, I'm going to make the most of the Nails Inc colours I have.  Who knows, I may just develop a love affair with them. Or not.

Here's a very simple manicure here, done with Heather Grey.  .
The Diet Coke sticker is there because the polish was free (if you bought two bottles of Diet Coke), during a recent promotion that was running at Boots.  My poor old hubby was prepared to by the entire cooler section in the store in order to get these for me, but when he went looking, they weren't put on the shop floor. A friend of mine ended up coming round with four bottles of Coke and two polishes for me instead :-)

For this manicure I used all Nails Inc products (base, colour and top coat). I have to say that I like the consistency and the brushes too. My only gripe is that it has already started to chip on my right hand after one day...I'm wondering if that's because on that hand I only used one layer of top coat instead of two. I don't know, but as a result, I'm going to have to re-do my nails. Boo.

The colour shown is true to life and I actually like it.  So much for me moaning about the company not having any colours that interested me.

The water decals were bought from Wicked Nails and they remind me of water colour paintings. I couldn't be without stickers or decals, because you can make your nails look good in a few minutes and with minimal effort. Just paint your nails, put some stickers on and you're good to go!

xx