Showing posts with label flowers. Show all posts

Sunday, 27 October 2013

Proceed with 'Caution' - Gelish

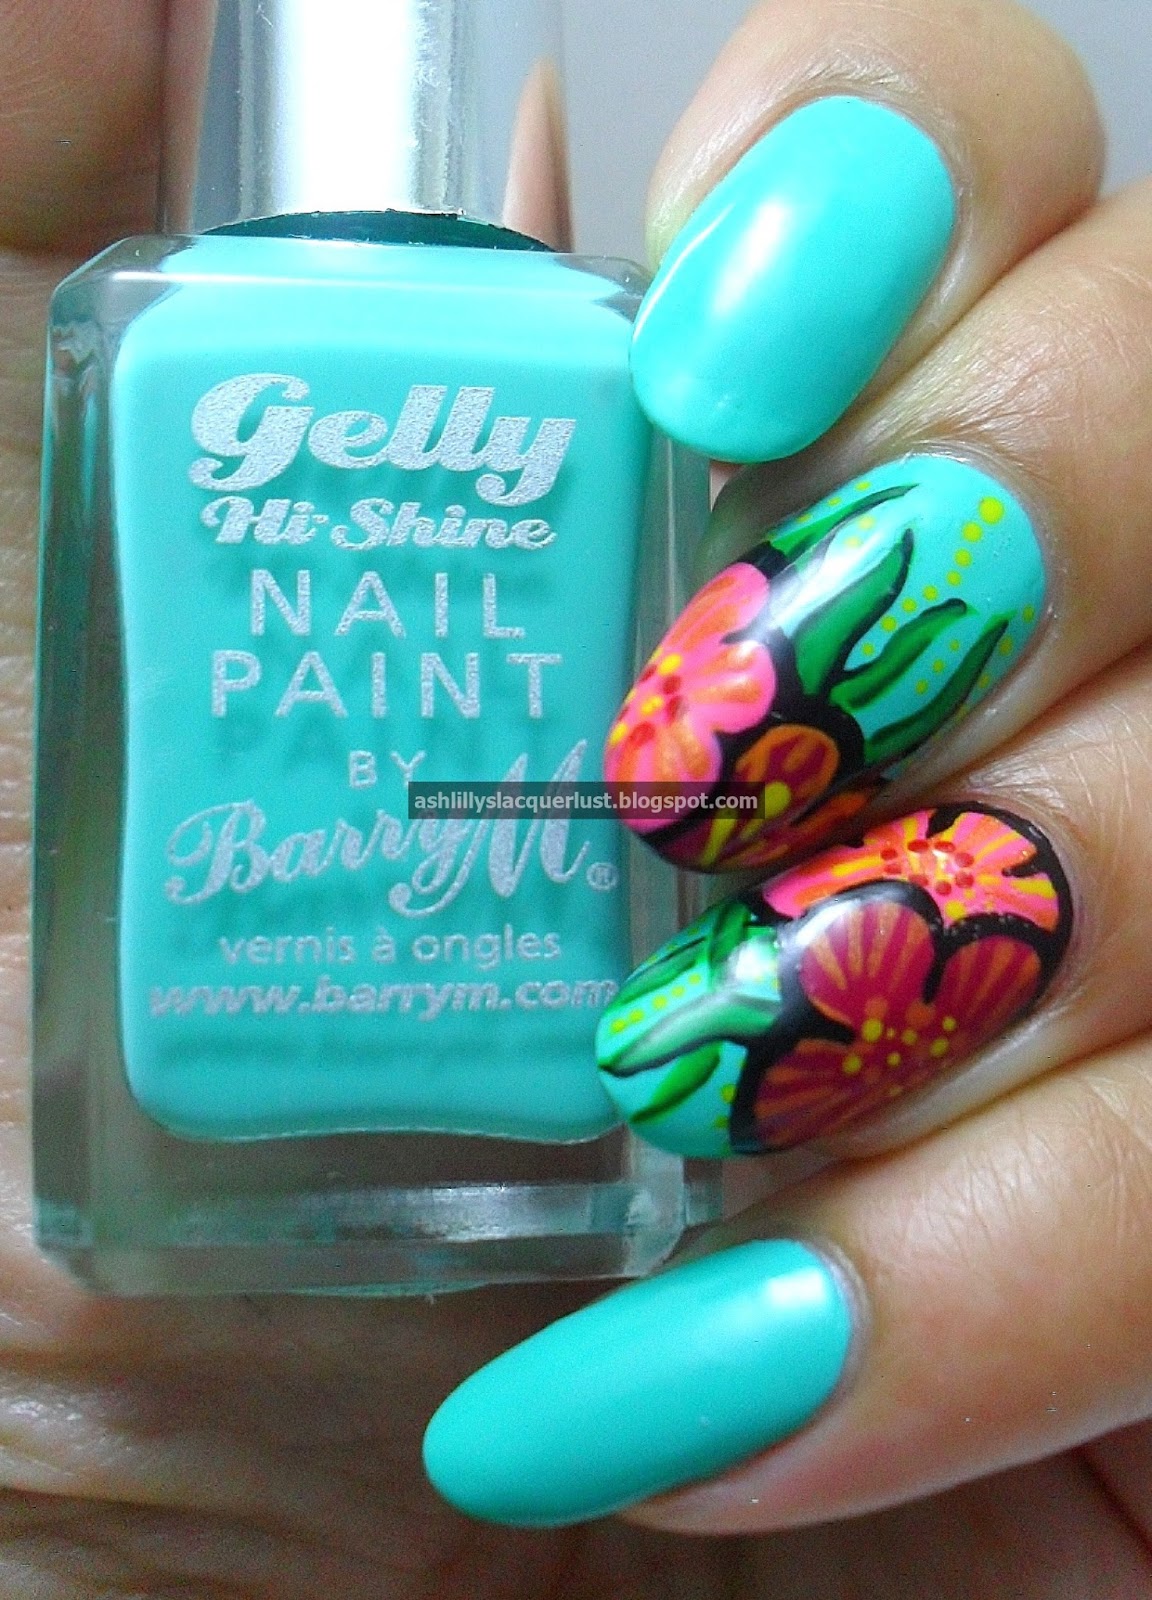
I recently ordered some really nice Gelish colours and due to me having a busy few weeks, this is the manicure that I have been wearing.

Gelish 'Caution'.
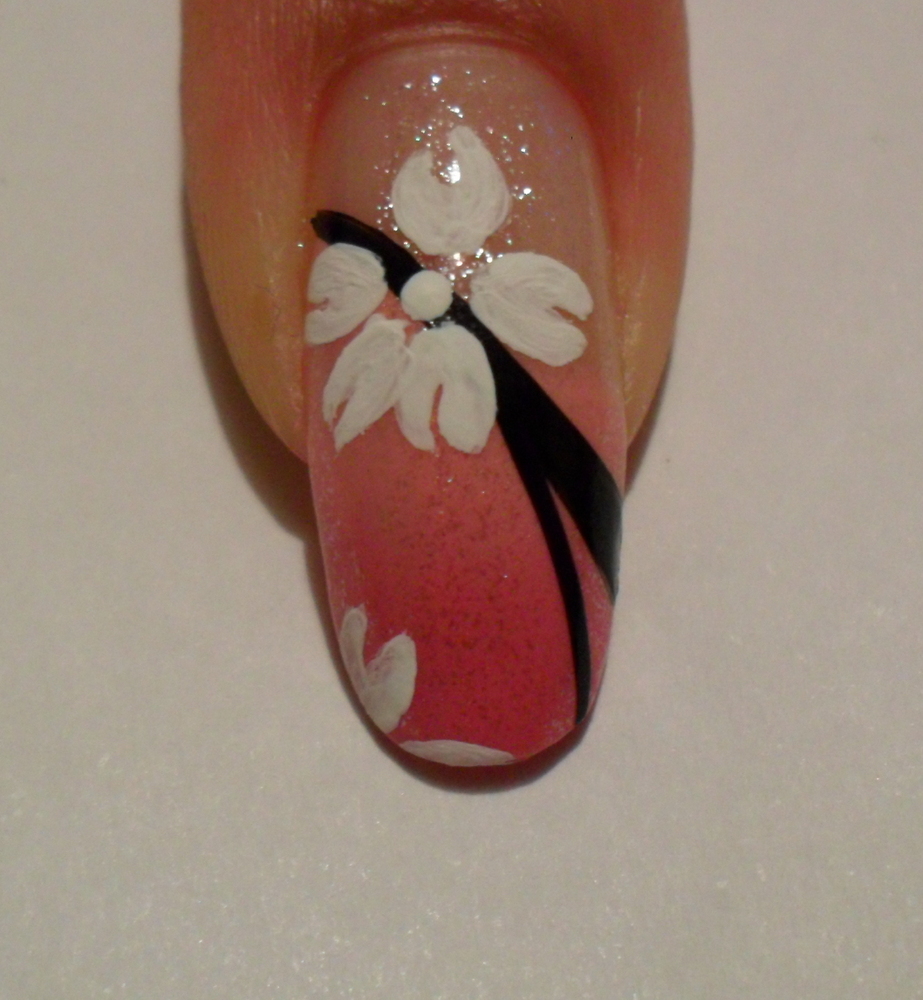
I accomplished this look with white striping tape and some gems that I got from eBay (not Swarovski).  

The floral detailing was painted (free-hand) with white acrylic paint after I had put down the striping tape. Usually with gel polishes, you are left with a sticky dispersal layer after curing. You would generally wipe this away prior to adding any art, but on this occasion, I placed the tape on after partly curing my last layer of colour for about 10 seconds. After adding the tape. I cured for another 20 seconds under an LED lamp and then added the top coat. When this was cured, I removed the dispersal layer, buffed LIGHTLY with a white block, painted on the flowers and added another layer of top coat when the paint was dry.

Here's a sneaky peak at my right hand, which is completely unused to modelling! I'll let you into a little secret...this was done about two weeks ago has grown out now although the gems are still intact. I'll probably remove it tonight though, because I'll be manicuring on a nail bar this coming week and want my nails to look freshly done!

If you wear gel polish, how long will you usually wear it before removal?

Have a great week.

x

Tuesday, 6 August 2013

Barry M - Tropical Florals

Tonight on the blog, I have some hand painted flowers for you.

The inspiration to do this design actually came from a pair of flip-flops - one's that I am wearing right now, actually.

Please excuse the picture quality. My camera has dropped a million times and I'm actually surprised that the thing even works now! Time to upgrade methinks. Anyway, back to the nails...

 Barry M's 'Green Berry'.

 The art is a combination of Barry M's 'Pomegranite', 'Mango' (both from the Gelly Range), Milani 'Neon Pink', green from a random eBay nail striper and detailing with Nail Supreme nail art pens in neon and matte colours. Those of you who know how miserable I can be will be aware that I struggled with these pens for a while...I like them now!


Thanks all for tonight folks. If you want further info - just let me know. Maybe I might even do a tutorial...let me know what you think?

xx

Friday, 28 June 2013

Just a bit of glitter and stickers

Today, I thought I'd show you a mani that I have been wearing for about a week. 

This is gel polish, and some Nailtopia nail stickers.

 The stickers are roses and the rest is acrylic paint.


  The lines are done with a very thin detailing brush and the dots? A dotting tool!


Here they are again in a 'negative space' manicure. The polish is gelish this time.

The stickers are thick and raised, so if using them with nail polish or gel polish, you will feel them if you run your finger over them. I suppose that this isn't a bad thing really - the stickers are quite sturdy as a result. I can't really fault them and I have been quietly adding these to my stash since last year...shhhh. It's not just polish that I hoard (muhahahahaaaa!)

xx

Sunday, 6 January 2013

Party menu

Hi everyone.

This is a quick post to show you the menu I had for a nail polish party I did a few days before Christmas '12 (that makes it sound so far away, doesn't it?)


I can't wait until my next party - it was so much fun!

xx

Tuesday, 27 November 2012

Boutique Nails

Okay, so I've finally downloaded an app which will allow me to blog (with pictures) on the go, straight from my phone. I'm really, REALLY hoping this will work, because I would prefer to blog in real time as opposed to whenever I have five minutes to off-load a backlog of posts.

Here goes...

Here are a few pictures of nail set that I painted recently:


I now have a little on-line shop ( boutiquenails.bigcartel.com ) where I'm selling my hand painted nail sets and a few rings. I add new items regularly so feel free to visit and peruse. If you have any questions, ask down below! Have a look here at EpiphannieA wearing my 'Rhino' nail set (and please follow her blog because she's AWESOME...and has a better camera than I *sniff*)


Another picture of a pink neon set.

Whilst I know a lot of you are perfect polishers already, there are a lot of ladies who prefer to have someone polish their nails for them. Some people also prefer the convenience of press-on nails. If you think you know someone who would like a set as a gift, please visit the site and contact me. 

There's a 22% discount on orders, for two weeks, to coincide with what was my second blogger anniversary...in October (shakes head)! Just use the code: TWOYEARS

Let me know what you think?


xx

Sunday, 18 November 2012

Floral practice with nail art pens

I'm not one for horoscopes and tarot cards. Fortune tellers scare me and I will never have my tea leaves read. I do, however, believe that my own horoscope characteristics are true. I'm a Taurean and amongst a lot of the other traits that we are supposed to have (like enjoying cake), I can be a bit reluctant to change things I'm comfortable with.  Fortunately, I know when I am being belligerent and stubborn - most of the time. I can also embrace change too...

I've always preferred using detailing brushes and have managed to find some that I'm comfortable with. When I was at Olympia Beauty in September, I saw some nail art pens and thought 'Pah, it's not a brush, so I don't like it'. A few weeks later I found some on Ebay and after days of mulling it over, I finally bought some. Here's what I did with them.

These are my FIRST attempt at anything with them. They took some getting used to...

Here they are, my Nail Supreme nail art pens. £20 on Ebay.
I love that you can unscrew them in the middle and organise the colours the way you want to.

The flow took some getting used to. As I squeezed the pens, the varnish would sometimes spit out a big blob, right onto the nail. At other times, the pens flowed too much so I'd get thick lines instead of thin. I suppose it's all about practice though, isn't?

The nib is a lot tinier than other pens that I've used. If you unscrew the black lid, you'll find a normal sized nail polish brush.

I really like them...but I won't give up my detail brushes.

Do you have any of these pens? What do you think of them?

Have a lovely Sunday.

xx

Friday, 20 January 2012

My second attempt at a 'one-stroke' manicure...

Hello friends old and new.

Today I finally tried to use some of the numerous nail art brushes that are languishing in the bottom draw of my Helmer.  I did this very quickly (trying to grab the last of the natural light after the school run) but alas, my photos are somewhat lacking.  My home-made light box has now been hi-jacked by my cat and I don't have the heart to evict her. So, until I can get to a craft store to buy some sheets of plastic to make another, I'll just have to settle for sticking my hand out of the garden door in the freezing weather to take pictures.

My nails are getting shorter by the week - these women on my manicure course are devils with emery boards. If I file these bad boys right down, those sadists won't have anything to play with.  One woman was trying to slice off dry skin around my cuticles with a cuticle knife. Seriously. I don't HAVE anything to cut and I just know she was trying to slice me up, just so that she could practise with that knife. Next week we go on to pedicures. BARF.


 A mini bottle of China Glaze's 'Urban-Night' from the Metro Collection (2011), such a beautiful purple cream.

Ha! This was the jumper dress I was wearing today...perfect match.

One-stroke 'technique' with red and white acrylic paint.  Also some extremely lazy dotting...with a striping brush. For shame.

It's not perfect yet, so until I get it completely right, I won't post a tutorial. No point in showing you how to do something the wrong way, is there?

I hope you likey!

xx

Monday, 8 August 2011

Hand-painted Blossom tutorial

Hello friends, how are you?

At the moment we are in the midst of riots in London (which have also spread to Birmingham and Leeds...so far). I'm not going to go into the negativity that has caused it all, so this post is intended to lighten the mood a little.

Today I have a tutorial for you.


This is my hand-painted flower design.

Here's the tutorial:

1. Start with bare nails and add two layers of Claire's Mood Polish in 'Awesome/Silly' to the tips. Yes, I'm showing my right hand!!!!

2. Add a layer of Sally Hansen's Diamond Strength in 'Diamonds'.

3. Add black stripes with nail polish.

4. Add a dot of white acrylic paint as a guide to the centre of the flower.

5. Start your petals off as'U' shapes. This was the easiest way for me to do it.

5. Fill them in.

6. Add stripes of red paint to make your petals look like petals, lol!

7. Add dots of clear nail varnish to the centre of your flower, wait for it to become tacky and then dip your nail into some gold coloured balls.


I hope you liked the design. I'm sorry the pictures of the steps were so amateurish - I painted my nails at night and I was too tired to get the light box out to take pictures. 

xx

Friday, 6 May 2011

Handpainted design

Hi friends!

I'm having trouble trying to name my manicures - brain freeze.

This one is inspired by an H&M dress that I was wearing recently.  I used 17's Twighlight Teaser as a base and acrylic paints for the flowers/pattern/thingies.


Um, not one of my best but hey!

xx

Saturday, 26 February 2011

Half moons and roses...

 My Friday fingers...


The other day I was over at Nail Art Express and I saw this gorgeous design:

If you haven't already seen Ying's blog, I suggest you take a look.  She has some serious talent. So much so,  I had to ask her if I could try the design out for myself. 

I tried to replicate the design:

 I used Beauty UK's Glam Nails in Soft Grey.  Three coats made it opaque and I didn't have to wait long; this polish dried very quickly. 

 My acrylic paints come in handy.

I put dots of paint next to each other and swirled them around until they looked like flowers; I'm still learning how to make them look less like blobs! My half moons aren't great either, but I did them free-hand because I didn't have any french manicure guides.

I hope you likey :-)

Oh, and I had a great time at the circus yesterday, but my phone has no flash and my pictures came out too dark.  My hubby has some nice ones so I'll try to steal them and put them up at some point.

xx

Saturday, 19 February 2011

On a Saturday night, the polish comes out.

Hi friends.

A big welcome to my new readers - thanks for visiting me :-)

If I still have the energy after the kids have gone to bed, I like to play with my paints and polish. As you've seen before, sometimes my experimentation doesn't always work, but I feel no way about showing my successes and failures.

Here are a few nails that I've been toying with.  First, I will warn you that at the bottom of the post will be some pictures of my current pedicure...and that of my daughter's design on one toe. I'm not a 'foot person' and I know that they gross some people out, so I tried to distract your attention a little bit.

 I was just trying out new things - they are not supposed to be proper patterns.  I've just plonked things in random places because I was running out of tips (which I'd stuck to some wooden skewers).

I saw this black pattern somewhere on-line and the rest were just inspired by other pictures floating around in the ether somewhere. If you've seen them somewhere too, let me know. I'm not trying to plagiarise!


 These tulips were something I actually I thought of myself and the hearts were commissioned by the little one. She actually indicated that she wanted polka dots because she made me a heart fridge magnet with the same pattern on it today.
She's a romantic, my little girl *rolls eyes*.

Here are my tootsies. I'm sorry if I offended anyone, lol!

BTW, if you are wondering why there are so many dots, it's because I was playing with my new marbling/dotting tool.

xx


Thursday, 17 February 2011

Vivalanails stickers and Famous polish

Today was my first day back at work. Admittedly, I was a little anxious, because the work can be pretty intense at times. Thankfully, today was filled with a little gossip, some welcomes and some promises that I'll be eased in gently.  We'll see what it's like next week :-0!

In my last post, I mentioned that I was sent some water decals for review by Vivalanails.  As it happens, I was a little wrong (lol). After painting my nails, I had my little pot of water ready to go...and then I realised that the packet that I chose to use were actually stickers. The packaging only has the site name on it (no instructions or description), so because I didn't take plastic off the packaging to have a proper look I was a tad confused! So I actually have three packs of stickers and three packs of water decals!

I also found a polish I haven't tried before too...huh. Can't find anything when I'm organised, but I find new polish when everything is languishing at the bottom of a plastic bag. The story of my life.

 This has little gold particles of glitter in it. Very Christmassy.

The stickers have a 'rhinestone' in the middle of the larger flowers.

 They are pretty sturdy actually and there are 58 individual pieces.

I only used one layer of top coat and the stickers laughed at my nail polish remover when it was time to take them off. Like I said. Sturdy.  I really like these actually. What do you think? Would you wear them yourself?

By the way, I thought I should mention that this is the first European website that I have seen that sells such a large range of nail art supplies including nail art magazines. I intend to buy one of these soon so I'll keep you posted about my findings.

xx