Wednesday, 20 June 2012

What I'm wearing now...

Hi everyone (and a big hi to my new readers!)

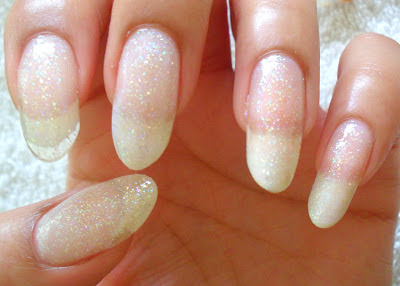
This is a short post, because quite frankly there isn't much I can say about this manicure.

It's a random blue by Beauty UK (and the label has come off)...and two coats of the very lovely 'Whimsical' by Revlon.

This manicure has drawn a lot of attention, I must say. I'm not quite sure what it is, but the two of these polishes combined just pop. Do you have a favourited combination of colours/polishes?

xx

Tuesday, 19 June 2012

Breakage...and mend-age!

Hey friends.

More and more I find it increasingly difficult to blog very regularly, so I thought about using Blogger's ingenius method of blogging on the go. I was looking forward to being able to blog from my car (parked, of course), from my office desk (on my lunchbreak, of course) and whilst out shopping (for nail polish, of course!)
Imagine my sheer frustration when I remembered why I hadn't set this up sooner. It doesn't work.

Now, I don't know if it's me not being able to take simple instruction, but my iPhone will not co-operate. Blogger keeps telling me that my device is not registered and that I need to email them...which I do over and over again, but nothing works.

Can someone tell me what I need to do to make this on-the-go marlarky work? Please?

OKAY, NAILS!

 So, I broke my nail off when the baby decided to take a lie down in the middle of the street. Yes, she fell down from standing up, stationary. I think she's probably having a growth spurt and she's a little off kilter.  I scooped her up with the one hand before she actually touched the pavement and gave her some kisses, but she looked pretty confused when she was verticle again. My nail was left on the ground and I was left with a decision to make; chop them all or fix the one. Guess what I chose?


This is gel overlay with a plastic tip. Honestly, I'd rather not have any tips on, but hey, the nail needs a little help right now!

Take care all ;)

xx

Saturday, 16 June 2012

Two for the price of one

Hey friends.

I was wearing this hot pink by NYX the other day and had started to get a little tired of the lack of pattern. I'd been watching the Giogo Girls videos on YouTube and decided to get my acrylic paint out.

This is what I came up with:

 In Giogo world, 'Get in or get out' is simply 'What's hot and what's not'. I tweeted the picture and also put it up on my instagram (ashlilly_the _lacquer_lover) and the girls themselves gave me a 'Get In'!

No, I didn't paint the other hand. I cannot write with my left hand at all, so it wouldn't have been pleasing on the eye!

This week I've also been wearing this entire week:

 Go faster stripes!


That's all for tonight. I've been so pre-occupied with other things of late and I rarely get to change my polish during the week now. I need to get back on track.

Thanks for reading!

xx

Sunday, 10 June 2012

Foil application tutorial

Hi everyone.

Last post I told you that I had a tutorial for applying foils to your nails...well, here it is.  Whilst it's not rocket science, there are rules that you have to follow to ensure that you get perfect application.

This is 'Microdots'

The tutorial uses the foil from the previous post.
 Here are the items to use: a foil adhesive, the base coat or colour, a cotton bud, the foil and the foil top coat.

Start with measuring out the amount of foil you will need for each nail. You may also want to cut one or two extra pieces in case you make a mistake.

Apply a base (colour or coat). I chose a glitter base for this manicure. Make sure your base colour or coat has dried HARD. If it isn't, it may come away with your foil when you remove it.
After your polish is dry, apply a thin, even layer of adhesive. It will have a pearlised white appearance upon application and it will need to dry. You can use a hair dryer to dry the adhesive, but if you air dry, you're going to be waiting for about five minutes. I found this step the hardest because I kept trying to use the foil when the glue still wasn't dry!


 Apply with the shiny or design side up.  Rub the foil with a cotton bud or your finger so that foil pattern can be transferred to your nail. Remove the foil gently so as not to tear your design. If you find that some of your design did not transfer to your nail, re-apply the foil, rub and remove again.

Finally, apply the top coat. Float the polish down the nail rather than drag it - you don't want your design to smudge. There you have it!

I have yet to try the top coat on a shiny foil - that will be the test for me. I'll do that soon and of course, I'll let you know how it goes.

Have a lovely week folks ;)

xx

Tuesday, 5 June 2012

Foil me once, foil me twice

Hey everyone.

It's been the Queen's Jubilee weekend here in the UK and I've been pretty busy and also a bit under the weather (story of my life really).  I've now got a few manicures backed up, waiting to be posted, but rather than bombard you with them I will space them out.

A few weeks ago I tried my first ever foil manicure. It was a big fail. When I originally put it on, it had looked stunning. I then added a normal topcoat and the foil crinkled up like used Bacofoil. One of my Twitter buddies suggested that I actually use a special foil topcoat and this gave me the excuse to go to eBay and buy things!  I found Jennysellsfoils and ordered a topcoat by Kami from Jenny - the vendor. After I'd paid, I got a long automatic email back from her, giving instructions on how to use foils etc. I replied to the email thanking Jenny for her instructions and mentioned how frustrated I'd been...and she emailed me back again with even more tips. Talk about customer service! The topcoat also reached me the following day, along with a few sample foil strips, so I was pretty chuffed.

Here's the manicure:
'Tropical Sunrise' and the Kami Foil Topcoat.

 I put the foil on over a glitter base colour.


 'Tropical Sunrise'.

I do actually have a tutorial on how to use foils and I'll post it soon.

Have you used foils before? How did you find them?