Friday, 16 May 2014

OPI Muppets Most Wanted Collection - 'I Love Applause' and 'Let's Do Anything We Want'

Greetings fair readers, how are you??!

It has been a while, hasn't it? I took a well needed sabbatical from Blogger, but I didn't stop painting nails.

Over the last few months I have been privy to experiences I could only have dreamed of. I've had ups, I've had downs, but I am happy to say that I return to my trusty readership with a new zest for life...and polish. Needless to say, I am a little late to the party with some of my nail art and reviews, but please stay tuned because I have A LOT to show you over the coming posts.

First, I'll return to my good old beauty blogger roots - a swatch (hazzah!).

OPI's Muppets Most Wanted Collection (2 of 8)
'I Love Applause' is a beautiful pale creme polish. No shimmer, just a yummy pink, reminiscent of my favourite childhood dessert - Angel Delight.


'Let's Do Anything We Want' is a clear jelly stuffed with pink and white glitter particles, with some chunky white squares chucked in for good measure.

Totally worth layering, wouldn't you say?


What can I say? The combination works and it's perfect for a Summer time pedicure. Fingers crossed that the weather in good old Blighty (slang for Britain) stays nice and dry for us!

I will be back again with a few more polishes in this collection, but in the interim, thanks for reading!

xx

Products sent to me for my consideration

Sunday, 27 October 2013

Proceed with 'Caution' - Gelish

I recently ordered some really nice Gelish colours and due to me having a busy few weeks, this is the manicure that I have been wearing.

Gelish 'Caution'.
I accomplished this look with white striping tape and some gems that I got from eBay (not Swarovski).  

The floral detailing was painted (free-hand) with white acrylic paint after I had put down the striping tape. Usually with gel polishes, you are left with a sticky dispersal layer after curing. You would generally wipe this away prior to adding any art, but on this occasion, I placed the tape on after partly curing my last layer of colour for about 10 seconds. After adding the tape. I cured for another 20 seconds under an LED lamp and then added the top coat. When this was cured, I removed the dispersal layer, buffed LIGHTLY with a white block, painted on the flowers and added another layer of top coat when the paint was dry.

Here's a sneaky peak at my right hand, which is completely unused to modelling! I'll let you into a little secret...this was done about two weeks ago has grown out now although the gems are still intact. I'll probably remove it tonight though, because I'll be manicuring on a nail bar this coming week and want my nails to look freshly done!

If you wear gel polish, how long will you usually wear it before removal?

Have a great week.

x

Tuesday, 8 October 2013

Estee Lauder inspiration

Oh. My. Goodness.

Weeks without posting here on my blog. Absolutely appalling.

Without further ado, I present to you...

 Some Estee Lauder inspired nail art! That's right. I've been completely and utterly neglectful and have failed to provide my lovely readers with regular updates and nail-candy.


These nails are actually modelled on a cosmetics bag that was being given away as part of a promotion in Debenhams recently.  The black is acrylic paint and the rest is all nail polish. Check out the Swarovksi Elements Crystals too *wags fingers* - does the shine hurt your eyes much? I pushed the stones into tacky polish and then dabbed around the edges with clear polish to set them. As I knew that this manicure wasn't one I was going to be wearing for too long, I didn't bother with gel top coat. As I'm doing a lot more manicure work nowadays, I tend to slather all of my manicures in a Gelish top coat.


 One more picture before I go!

Thanks for reading - have a good week.

xx

Thursday, 15 August 2013

My new (false) nails

Hi everyone.

Before I carry on with the post, I want you to know that I bought a new camera...but I'm still trying to figure out all of the settings. You may find the next few posts a little fuzzy but please be patient with me!

I haven't been looking after my nails very well recently and as a result, my nails became extra hard and brittle. I've bought various new products and rather than try them out on other people first, I am always use them on myself. Anyway, after battling with a ridiculously curled middle finger nail, I decided to chop them all off and give myself a set of acrylic nails.


First, I started out with short, sad, battered nails:

Then I blended some natural coloured tips after applying them:
I took my eye off the file to tell one of the kids to stop doing whatever it was they were doing and I nicked my thumb!

After? Not too thick. I ended up using white acrylic on the tip and pink for the rest of the enhancement.

I'm happy with them at the moment, but I can't bear to see the underside of the nail when the enhancement starts to grow out. As a result, I'll probably only wear these for a month or so.

I'm off to paint these bad boys because I'm working at V Fest this weekend (YAY!) and need to look half decent.

Have a great weekend folks.

xx

Tuesday, 13 August 2013

Swap In The City UK


Hi everyone.

Tonight I want to let you know that I am honoured to be providing manicures as L does Nails at an amazing event called Swap In The City UK (SITUK), which takes place on Sunday 25th August 2013 at The Royal Horseguards Hotel in London.


Okay, now for the info!

'An afternoon of fun and relaxation, SITCUK offers indulgent beauty treatments and sampling in the SITCUK ‘Beauty Fusion’, including nails, hair and well-being treats. You’ll also have the opportunity to swap your good quality clothing and meet like-minded women, whilst giving back to charity and making a difference to the environment!

SITCUK has held several successful events including being a part of The Good Fashion Show during London Fashion Week 2012.
SITCUK events allow women to have a positive impact on others, by donating quality items to the swap or taking part in the clothes auction.
Items are kindly donated by celebrities for the auction and the proceeds go to charity partners of the event. All whilst being pampered and having a fun-filled ladies event in luxurious surroundings.'

 The event is being held at The Royal Horseguards Hotel, which promises a five-star luxury experience overlooking the Thames and I absolutely can't wait. There will be price draws too...and everyone likes a freebie. Please visit SITCUK for further details and to buy tickets.

If you are in London, why not come down and join us?

xx

Tuesday, 6 August 2013

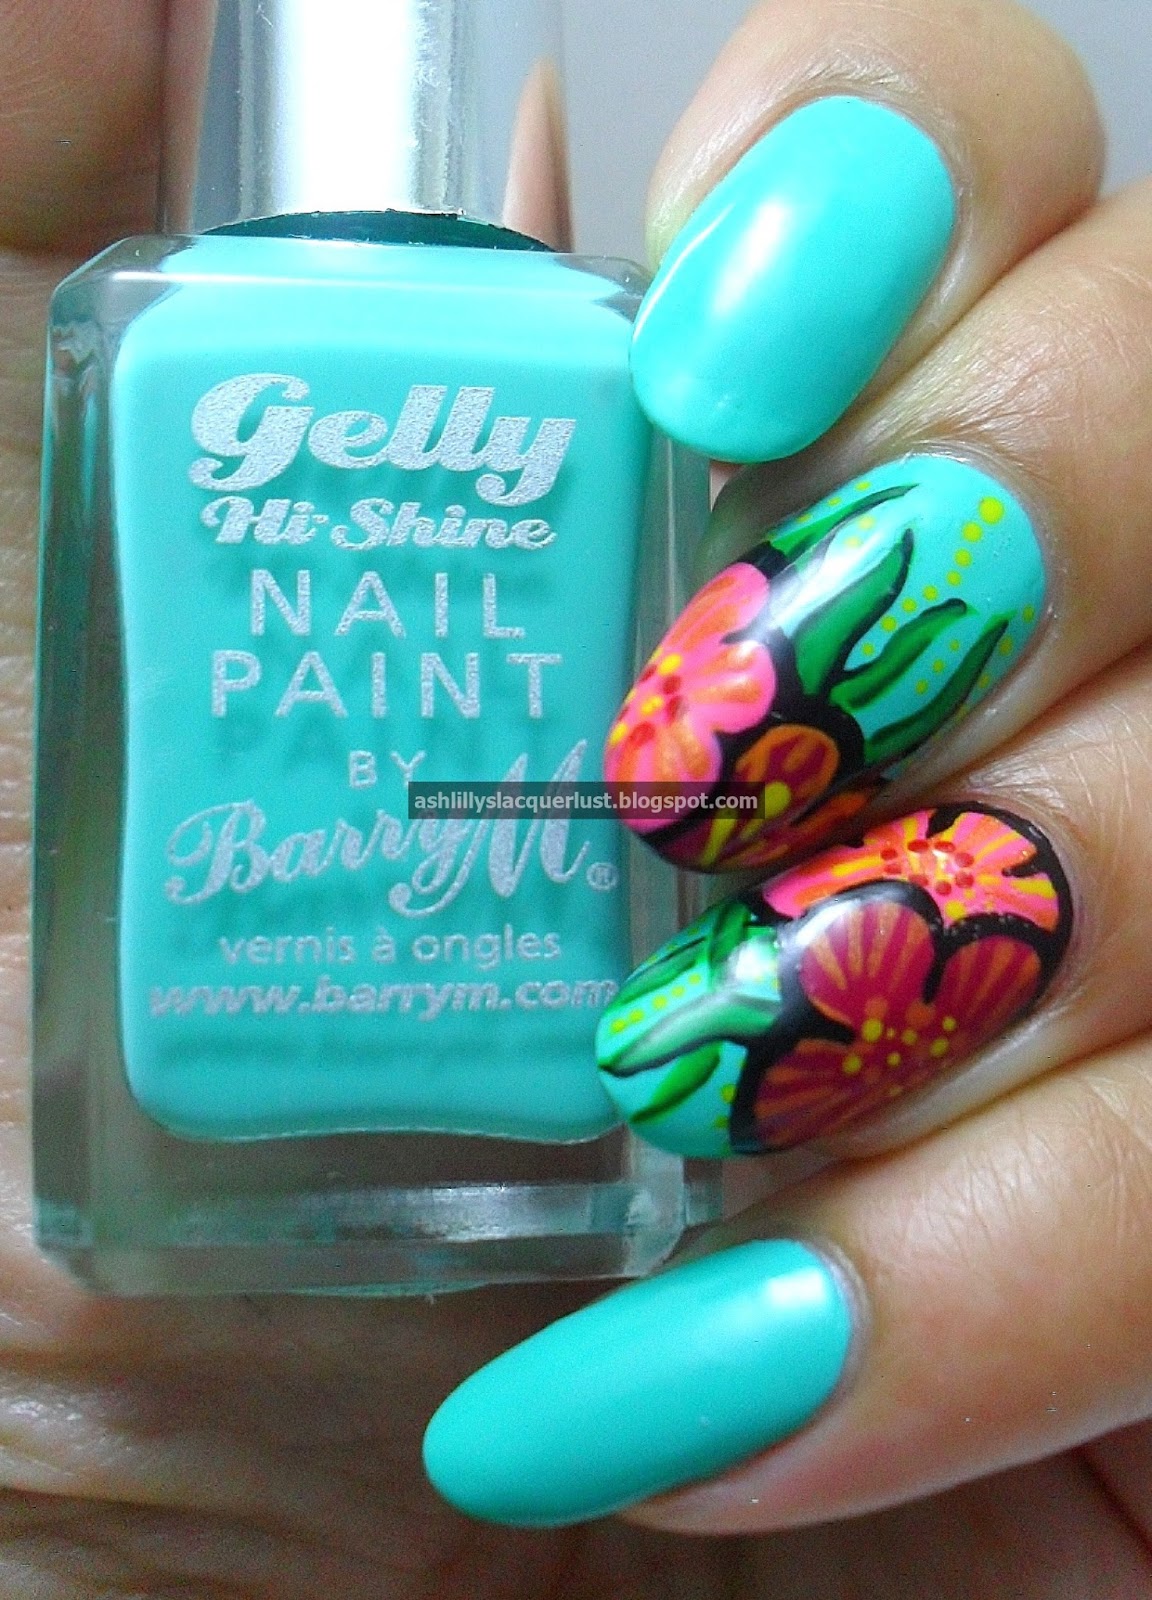
Barry M - Tropical Florals

Tonight on the blog, I have some hand painted flowers for you.

The inspiration to do this design actually came from a pair of flip-flops - one's that I am wearing right now, actually.

Please excuse the picture quality. My camera has dropped a million times and I'm actually surprised that the thing even works now! Time to upgrade methinks. Anyway, back to the nails...

 Barry M's 'Green Berry'.

 The art is a combination of Barry M's 'Pomegranite', 'Mango' (both from the Gelly Range), Milani 'Neon Pink', green from a random eBay nail striper and detailing with Nail Supreme nail art pens in neon and matte colours. Those of you who know how miserable I can be will be aware that I struggled with these pens for a while...I like them now!


Thanks all for tonight folks. If you want further info - just let me know. Maybe I might even do a tutorial...let me know what you think?

xx

Wednesday, 31 July 2013

L does Nails...yes I do!

In case you weren't already aware (admittedly, I didn't make a public announcement or anything), I recently began freelancing as a sessional nail technician...under the name of L does Nails .

When I first started out in the world of nails, it was via this blog which was born three years ago. Back then I was on maternity leave with my second child and it felt like I had all the time in the world, believe it or not. After returning to part-time work, I decided to get a nail qualification so that I could possibly run a mobile nail business as a side line. Unfortunately, the whole idea of being mobile didn't fit into my daily schedule, especially after I returned to working more hours per week and after doing a full day in the office, I'd be too tired to want to get back on the road to do nails.

By chance, I got an email from another freelance manicurist who needed my assistance. It was then that I was introduced to 'event nail art'. I've steadily been booked for work doing complimentary manicures on nail bars for press events, product launches and more recently, festivals. Even though my plans to be mobile didn't quite work out how I'd initially wanted them to, other doors have been opened for me and I'm really quite grateful that I've had such fortune. At this point, I'm insured, qualified, registered, trade and already up and running. If I could do this sort of thing full-time I would, but right now it's not feasible. Oh well, who knows what the future holds, eh?

Here's my logo, designed by Rhonda Brown, whom I 'met' on Instagram a year ago:
I love this so much - Rhonda created it after seeing my ideas in a make-shift drawing I did on a sticky label at my office desk!

At some point I will be trying to link my blog to my website, but that will happen in time.

Please stop by and have a look at my site - let me know what you think?

xx

Sunday, 28 July 2013

Sophy Robson's Nail Art Masterclass no.2

Hey everyone.


On 13th July , I went to a Nail Art Master Class run by none other than Sophy Robson 


See if you can find me...I'm the one with the big hair ;)

Here are a few of the nails I was able to do on the day:

The event was a lot of fun. I got to ask some pertinent questions about the nail industry, met someone who I have a lot of professional respect for and also got a few cocktails at the end!

The next Master Class will be a good one. Sophie Harris-Greenslade aka The Illustrated Nail will be there! I got to work with her recently (that's another story) and she's soooo nice.

If you're in London (or somewhere in the UK and fancy the journey) will YOU be going to the next class?

xx

Sunday, 21 July 2013

Farr Fest - Event nails

Hi everyone!

This is a short post on-the-go today. I was at the Farr Festival this weekend, with a group of other amazing manicurists. We were providing manicures with nail art for the festival go-ers.

Here's the menu of art that I was providing:


Unfortunately, as usual, I got carried away and forgot to take pictures! I did have a few guys asking for 'Farr' and 'Fest' on their thumbs...I'm glad they got involved!


xx

Wednesday, 3 July 2013

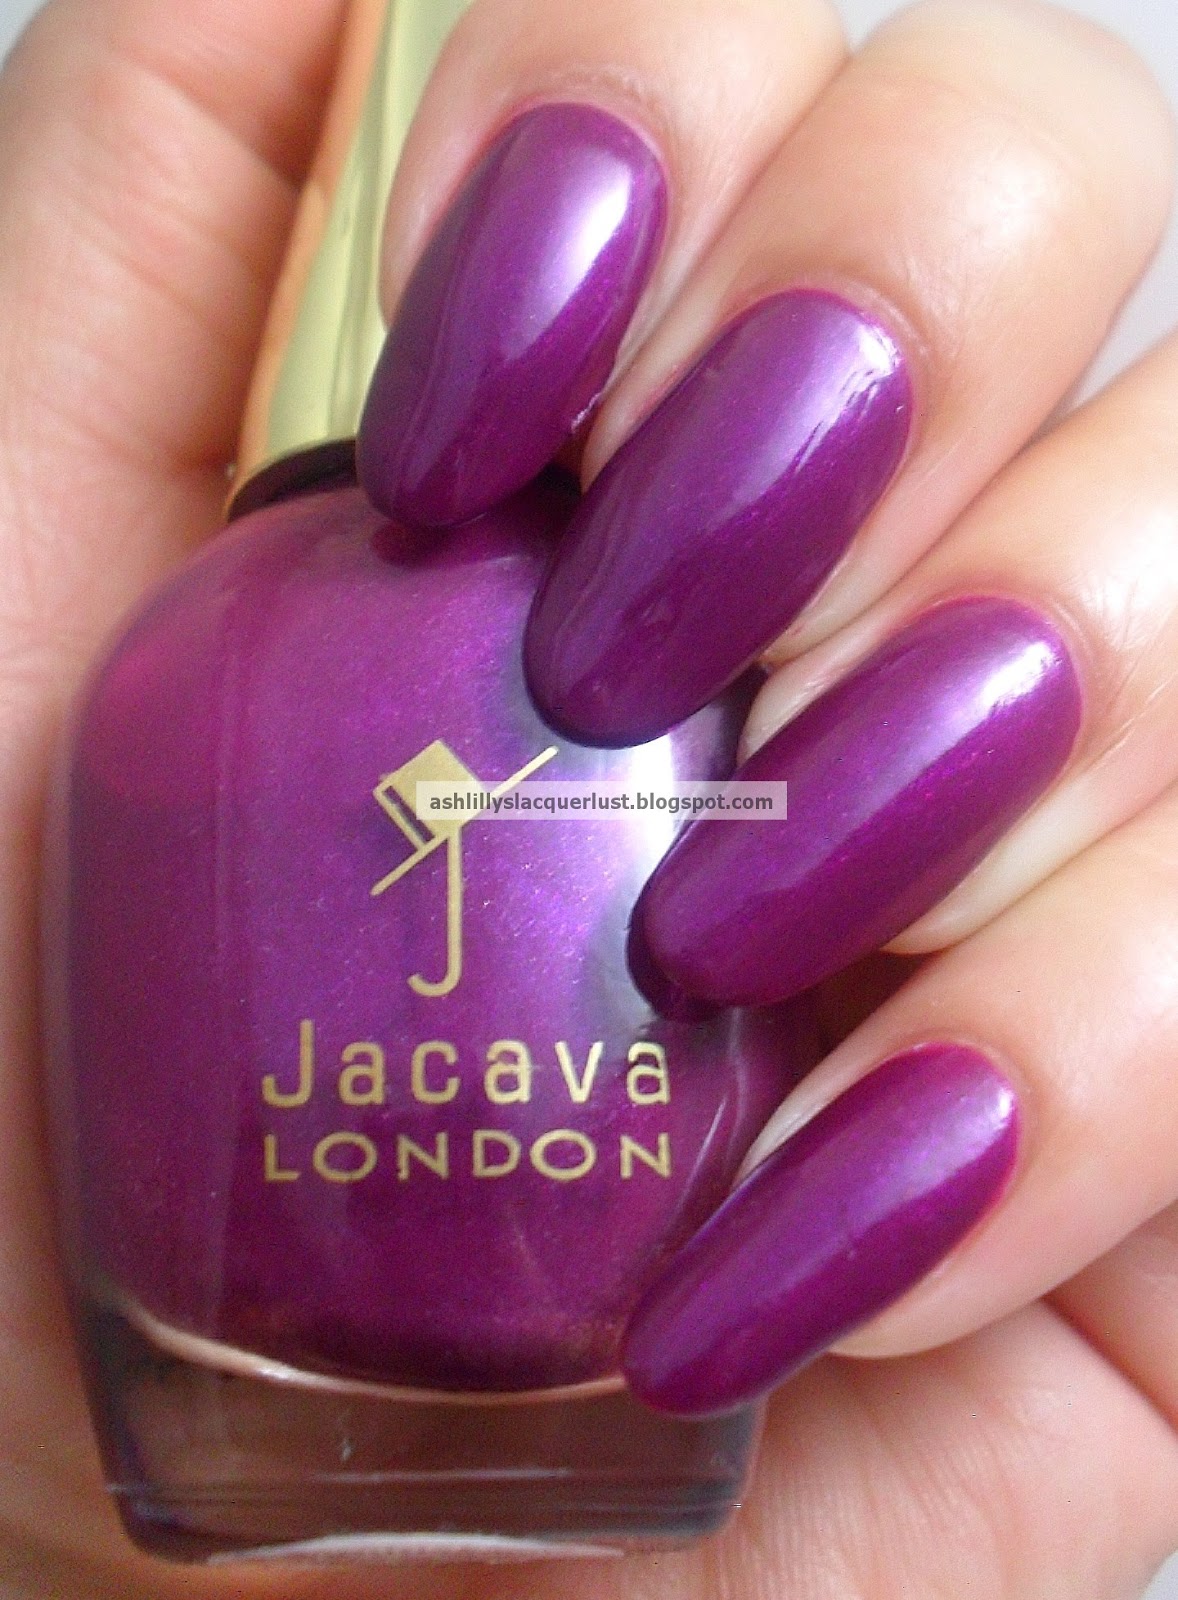
Jacava swatches

Hi everyone.

Tonight I have some Jacava swatches for you.

This is 'Damson Delight' - a dark red jelly polish...to which I added a few hand painted designs.


 'Marrakesh Nights' - this is a purple with a pink and blue shimmer.


 Last, but not least - 'Passion'. 
Personally, I think Damson Delight is my favourite out of the three although the other two are beautiful colours too. The formula is smooth and does not streak when applied. Have you tried any Jacava polishes?

xx

Friday, 28 June 2013

Just a bit of glitter and stickers

Today, I thought I'd show you a mani that I have been wearing for about a week. 

This is gel polish, and some Nailtopia nail stickers.

 The stickers are roses and the rest is acrylic paint.


  The lines are done with a very thin detailing brush and the dots? A dotting tool!


Here they are again in a 'negative space' manicure. The polish is gelish this time.

The stickers are thick and raised, so if using them with nail polish or gel polish, you will feel them if you run your finger over them. I suppose that this isn't a bad thing really - the stickers are quite sturdy as a result. I can't really fault them and I have been quietly adding these to my stash since last year...shhhh. It's not just polish that I hoard (muhahahahaaaa!)

xx

Friday, 21 June 2013

Zoya - Pixie dust!!

I'm pretty excited about this manicure - firstly because these are my first EVER Zoya Pixie Dust's and secondly because I took inspiration from one of my favourite nail artists - NailGurlNYC

 Here is Zoya's 'Stevie'.


And this is 'Beatrix.

These beautiful polishes are *from nailcareclub.com


I used two thin coats of colour on all nails apart from the pinkie - on that one, it was three thin coats and you can see the difference in colour. I didn't bother to gloss this up with a top coat because I prefer it in all of its bumpy glory.

Hope you like them!

xx
*Products sent for my consideration.

Wednesday, 19 June 2013

Elegant Touch Envy Wraps

Hey everyone!

Today I have some *Elegant Touch nail wraps to show you.

 I thought I'd try out the 'Black and Chevrons' pack.
Each pack comes with a sheet of nail wraps, an emery board and instructions. The 'accents' are extra stickers that you can put onto your nail wraps to jazz them up.

Initially, I was a little dismayed to see that the wraps were so short. My nails were quite long and I didn't want to cut them, so I thought I'd try to do something with the wraps anyway.


 I'm happy to say that the wraps were of a really good quality. They were very stretchy and I was able to manipulate them to fit the length of my nails, without compromising the strength of the wrap (well done Elegant Touch!). The wraps were very easy to use - they were self-adhesive, so all I had to do was remove them from the plastic sheet and stick them on nails that were first treated with a base coat. Once the wrap was on, I could stretch it into place and file off the excess product.

 Then, I just stuck on the accents! You might notice that the middle finger looks a little strange...the wrap simply wouldn't stretch any further. You may also notice a little bit of fluff near my pinkie - please ignore it, it just wanted it's moment in the limelight.

I'm not sure about how long these wraps would actually last because I took them off after a day. The wrap on my middle fingernail was too short and I could see my nail peeking out from underneath. If you have shorter nails, these would be perfect for you. They are sturdy, they look good and the accents give you the opportunity to be creative without getting nail polish all over you. No need for a top coat either - the wraps are made with 'UV Gel technology' which makes them shiny and resilient.

The wraps should be available, nationwide (UK) at Boots and Superdrug stores.

xx.
*Products sent for my consideration

Friday, 14 June 2013

Barry M Blue Grape Gelly

Tonight on the blog I want to show off my latest crush...

Barry M's  'Blue Grape Gelly', how I love thee. This picture doesn't even show how gorgeous it is.

I really had to take this picture under yellow light AND tweak this picture quite a bit to get the colouring right. The blue is very vibrant but is a little darker than shown here.

Honestly, you may just want to go and pic this one up yourselves - it's amazing. I love all of the gelly polishes because of the consistency, the shine and the colour variations but this one is my ultimate favourite.

Have you tried any of the gelly polishes yet? What do you think of them?

Tuesday, 4 June 2013

Zombie nails!

Recently I asked some of my Instagram followers what sort of nail art themes they would like me to try. One of the themes that popped up was 'Zombie'. I'm not the best at drawing/painting, but I think I'm able to get my ideas across...what do you think? By the way, feel free to click the link and follow me (@ldoesnails)

Zombie nails...macabre, but still fun *insert evil laugh*.

Here's a close-up of the brain nail. There's a bite taken out of it in the top corner, hehehe.

Drippy eyeball nail.

He's supposed to be a zombie, but he looks more like a Scooby Doo ghoul. Meh.

My favourite nail - the dismembered finger and craggy nail!

Erm...Zombie nail.

For the grey base, I used Maybelline Color Show 'Audacious Asphalt' and the rest was all acrylic paint.

I hope you like them :)

xx