Saturday, 8 October 2011

Bye-bye Summer :(

Happy Saturday friends.

As I type I lament the change in weather.  Seriously, last week it was roasting and I was slathering the kids in sunblock. Today, I'm typing s-l-o-w-l-y because my fingers are stiff from the cold. No, I'm not outside. I'm in my front room.

This manicure was done when it was hot - you can tell from the sunshine in the earlier photos. I was trying to capture the beginning of Autumn and the end of summer...

This is a mini bottle from Beauty UK. I couldn't find a name or number the bottle.


It's got lovely little golden particles in it.

I sponged on some Sally Hansen's Golden Cinnabar (which is more like a golden/bronze) and put on some Sunflower water decals by Viva la nails.

Sunflowers in Autumn.

I went and broke a nail on my right hand!!

 I fixed it with a nail tip and acrylic powder/liquid. I don't know how long it will last because I didn't use a primer (to remove the natural oils from my nail surface and adhere the acrylic to my nail properly). I'll have to do it properly though, I can't be bothered with putting a new false nail every so often!

What colours are you going to be wearing this Autumn/Winter? Do you go for season-specific colours or wear neons in the middle of November? :)

xx
 

Monday, 3 October 2011

More full nail water decals

Hey, all. Happy Monday!

Just a quick post about some water decals I wore a few weekends ago. I didn't really want to take them off either because they last much longer than plain varnish. I think that's probably to do with the fact that they don't chip easily.  If you like the look of a bold nails, they are perfect because they take a fraction of the time constructing a free-hand manicure would. 


My cuticles are flooded with a load of top-coat because I was in a hurry.  My only gripe with these things is that they are not wide enough to cover my nails from side to side. There is always this annoying 1 mm of bare nail on either side! I suppose that this could be remedied by painting the very sides of the nail with a colour that is similar to the decal though.

Hope you likey!

xx

Friday, 30 September 2011

Bulter and Wilson, Nails Inc and my current mani

Okay, so after the Collection 2000 launch, myself and Larry went off in search of a swift half, before bedtime.  As we wandered around, we came across some shop fronts that totally blew our minds. 

Check THESE out!


 We found these beauties at Butler and Wilson. These iPhone covers are not as expensive as you might think... Maybe if you're really good this year Santa might sort you out?

Nails Inc have also launched a Magnetic Polish range.


Apologies  for the poor quality shots; I had my face pressed up against the shop front window to get a snap of these bad boys. 

The display video in the window shows the nail technician painting the nails of a customer, taking the lid of the bottle (which has a magnet in it) and placing it near to the wet nail for a few seconds.  When the lid is removed, magnetic particles in the polish have been pulled into a pretty pattern. For those of you who haven't seen this before, it is definitely a sight to behold. Usually I don't rate Nails Inc polishes because I don't think the £10.50 - £11.00 price tag is always worth it. These bottles are £13 each! I don't know... would YOU buy these?

And now onto MY nails! This what I wore in the last post:

 Collection 2000's Fruit Salad with Nubar 2010 on the thumb, index and ring fingers. The stickers were a bit of a nightmare to get off the plastic backing sheet but I managed not to tear too many of them.


Hah. I tried to do an artsy shot like Anastacia but it wasn't quite the look I was going for. We don't have much in the way of plant life in our back garden!


Until next time!


xx

Thursday, 29 September 2011

My jollies at Collection 2000's new line release party...pic heavy!

Hello friends, hope you are well.

This post will be diverting somewhat from the norm (nails). Why? Well, I was invited by the very lovely Lauren from Collection 2000 PR to attend an evening of cocktails and cosmetics last night.  In honour of the brand I thought I might buy one of their polishes for the first time.

Some of you may be familiar with Collection 2000, a cosmetics line available at...wait for it...Boots AND Superdrug.  If you know me in the flesh, you will be aware that I do not work in retail and my job is FAR removed from the world of beauty. In short, my opinions in this post are mine and no-one has asked me to do anything apart from attend and play with make-up. Larry, one of my everlasting girlfriends, came with me to peruse.

 The new face of Collection 2000's Autumn/Winter line is Diana Vickers, a young singer well known for her successes during X Factor 2008. The products used to style her (all of the below) will be available at Boots and Superdrug from 5th and 25th October respectively.

The soiree was located in Hush, a swanky restaurant fairly near to Claridges in the West End of London and upon arrival I was met with a flutes of champagne and browsing rights. Wanna see what I saw?

A 'Smokey Eyes' palette (£4.99) with 9 individual colours and instructions about how not to make yourself look like a panda, Metallic Cream Eyeshadows (£2.99) which have an applicator like a lip gloss and Luscious Lashes in Natural and Glam Volume (£2.99)

Glam Crystals Dazzling Gel Liner (£2.99)

Nail Smash - in only two colours (£2.99)  I tried this on someone whilst I was there (I didn't want to ruin my own mani!) and I have to say, the white cracked really well.  I can't help thinking that Collection 2000 left it preeetty late to bring out their version of crackle polish.  Other brands have a multitude of colours already...

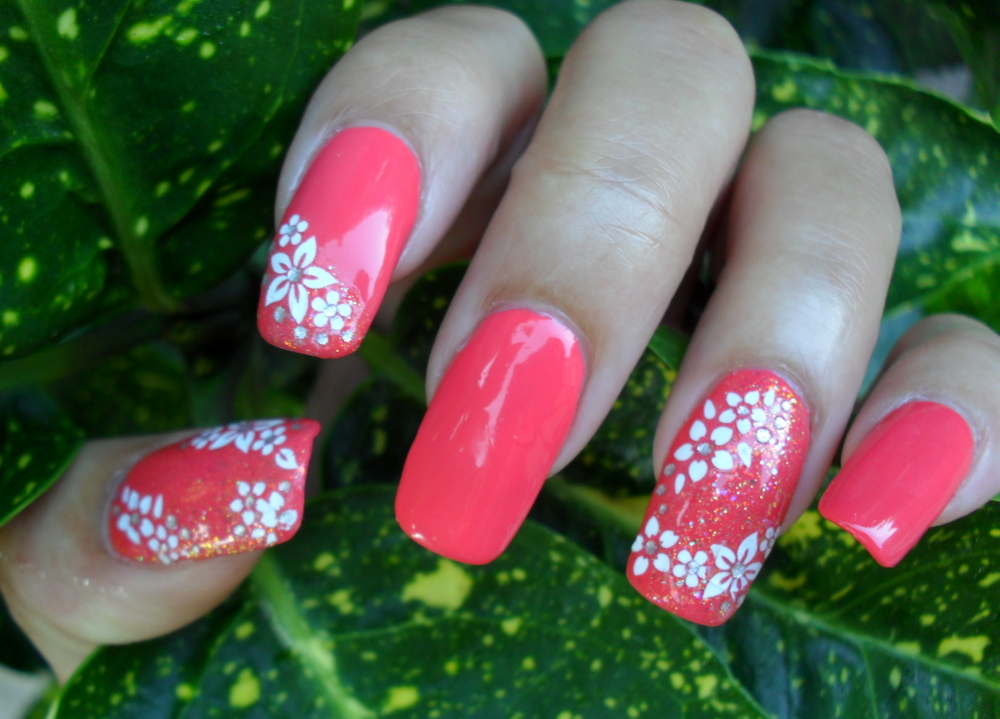
Now these are cute and right up my alley, lol! Shimmy shake and Scarlet (£1.79 8ml). They are fast dry and I know this because the manicure I wore was the same brand in Fruit Punch.

 Illuminating Touch Concealer (£?), Super Size Fat Lashes (£2.99), Pump up the Volume (£4.99) and Sky Scraper Mascara (£?) These seem to be the tools to use for impact lashes. I only have the Pump up the Volume but I have high hopes for it...I'll review it and get back to you.


 Cream puff lip glosses. I had one of these already and it feels like you are putting a moisturiser on your lips. It does dry matte though...so you may just want to put some other gloss over it if you don't like that effect. Like me. There is also the Lock n Hold lip gloss (which is supposed to last for up to 6 hours and I don't have a price for).
 Lasting Lipsticks at £3.49 I didn't get to look at any of these properly, because the room was low lit.

Lasting Perfection 16 hour wear powder. I don't know how much these are, but they come in fair, medium and um, dark. 
Unfortunately, the powder range is not something that a woman of darker skin tone would be able to wear. I'm a very light skinned black woman and these colours are no good for me.  In the corner there are some Colour Match Foundations (£5.99) which come in five shades...again none of which were appropriate for my skin tone.
There were other powders and polishes hanging around waiting to be played with but as the lighting was quite low, I didn't get an opportunity to get a good look.

My verdict on the new line? I liked what I saw. The nail polishes and eye products looked fantastic, along with the lashes. I'm also pretty eager to see if I can follow the instructions to create a smokey eye! I had a lovely evening and came away with some really nice products.  I also got to browse in Bond Street at 9pm (when I'm usually on my sofa zoning out) and see some stunning sights. Check back for my next blog post to find out more.

Disclaimer time!
I received these items for free and was NOT asked to review them or blog about them at all...although the pictures of Diana were on the cutest little USB stick which was in the goody bag stuffed full of cosmetics and product info...

xx

Monday, 26 September 2011

Leopard gradient

Hey, hey!

Today I would like to introduce you to my first (and possibly last) animal print manicure.  I don't know what it is...I like looking at them on other people, but not so much on myself.

Inside picture:

I used three different polishes to do the gradient, a pink to make spots and then some black acrylic paint to outline them (click  for a gradient tutorial). As usual, Clever Clogs forgot to take bottle pictures, so if you really want to know what I used, let me know in the comments section.

 Don't know what this colour is because I gave it away shortly afterwards, when I realised I had a dupe for the gold AND the purple. I don't like to hoard duplicates. If I have two colours that are similar, it's either by accident or because I want a back-up bottle.


 That pink flower? That was one of my sculpted acrylic trials. I don't have any hot pink acrylic; it was white and I painted it with the same colour polish I used for the spots! This picture shows the gradient a little better.

Hope you like it! Have a great week.

xx

Monday, 19 September 2011

Sculpted acrylic flowers: first attempt...pic heavy!

Hey everyone.

I've been trying my hand at making acrylic flowers for 3D nail art.  I know that it's possible to buy embellishments for your nails without having to do all the hard work yourself, but I wanted to try it out.  As this is my first attempt (and it's not perfection) I can't really call the rest of this post a tutorial...rather, it's a step-by-step of what I did.

I started with white acrylic powder and acrylic liquid that I bought on Ebay.
 I stuck a false nail onto a practice finger and wrapped it in cling film with the intentions of removing the flower once I had finished creating it.

 I don't have a glass dappen dish to put my acrylic liquid into (yet), so I used a lid from an old bottle of acetone I had.

 I soaked the brush in the liquid,wiped the excess off and drew it across the top of the powder to form a ball.

 I put the ball of acrylic onto the nail to start shaping it. It became quite liquified...I'm not sure that it was supposed to be so wet. Perhaps my liquid to powder ratio was a bit off.

 I pressed the tip of the brush into the acrylic.


Something that bares a slight resemblance to petals

Continue making petals in the same way...

 I tried to take flower off the clingfilm and it didn't want to budge. So I tried again with kitchen foil - much better. You can see the end result in the corner -------------------------------------^^

 This time I tried to angle the first set of petals. I then made smaller petals on top of those.

 I was able to slid the flower off the foil and can put it onto my own nail with a bit of clear polish.  Making the flowers on a fake nail will give it the curvature it needs for it to lay nicely against the nail.

Don't worry about the top two - I was messing around on this thumb nail. I actually sculpted the largest flower (or blob) straight onto my thumbnail.

In future, I will need to try to find a better liquid to powder ratio so that the acrylic is more pliable; mine was a little too wet. I think I will try to go for less layers on my flowers too. I may also try using different acrylic powder/liquids to see if that makes any difference.

Have you done this before? What have you come up with (provide your links so I can see!)
If you need details on the products I used, just send me an email/put your questions in the comments section.

Thanks for reading xx